Tag: Check List

  • How to plan trips with Notion

    How to plan trips with Notion

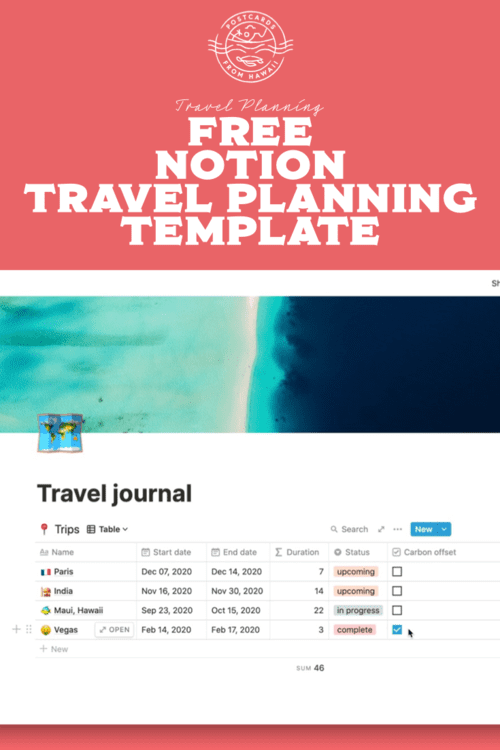
    For the first time ever, someone other than me has published a blog post on Postcards from Hawaii and here it is, Michael has written all about his love affair with Notion and why he uses it as his space for planning and organising our travels. Everyone plans and prepares for trips differently right? So we figured why not share with you an alternative way that he absolutely swears by!

    So Michael, take it away…

    Notion is a tool that helps you organise just about every aspect of your life. It works in your browser or as a dedicated app for Mac, Windows, iOS and Android. You can organise your every day via to do lists and goals, you can run your business on it through powerful project management tools and it works perfectly for single users and giant corporations alike.

    I use Notion mainly to run my animation studio, organising complicated projects, timelines and teams. However, the page I most enjoy opening in my Notion account isn’t work related at all, it’s my beautifully organised and very detailed travel journal. It’s the place I plan every single trip in and it’s been through many rounds of refinement to get it to its current form, a form that I am sharing in full with you as a Notion template, meaning you can use this very blueprint for your own adventures around the world. Let’s dive in!

    1. Sign up

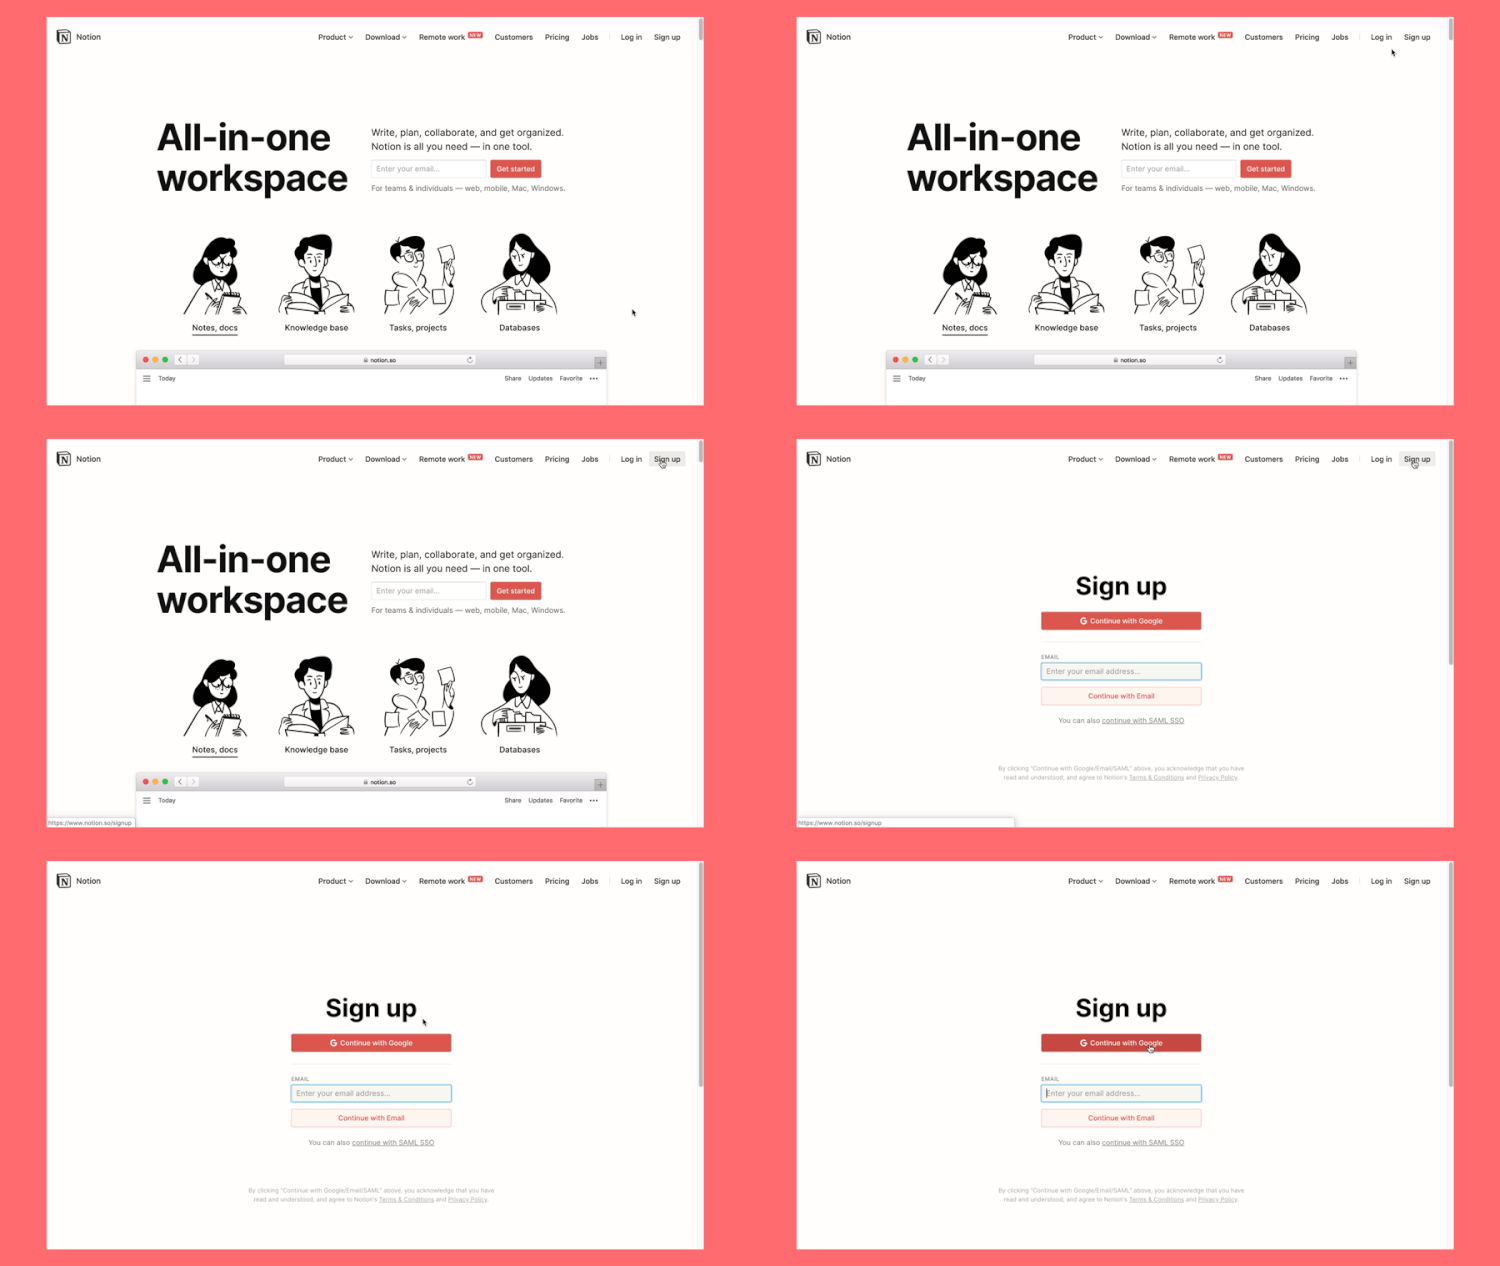
    To get started with this travel journal you will need a Notion account. If you already have one great, if you don’t, sign up here. You can easily use your Google account to create one with Notion. They offer a free account which has a limit on how much you can create, a $4/month personal subscription which offers unlimited creation and a couple of business plans.
    2. Duplicate my template

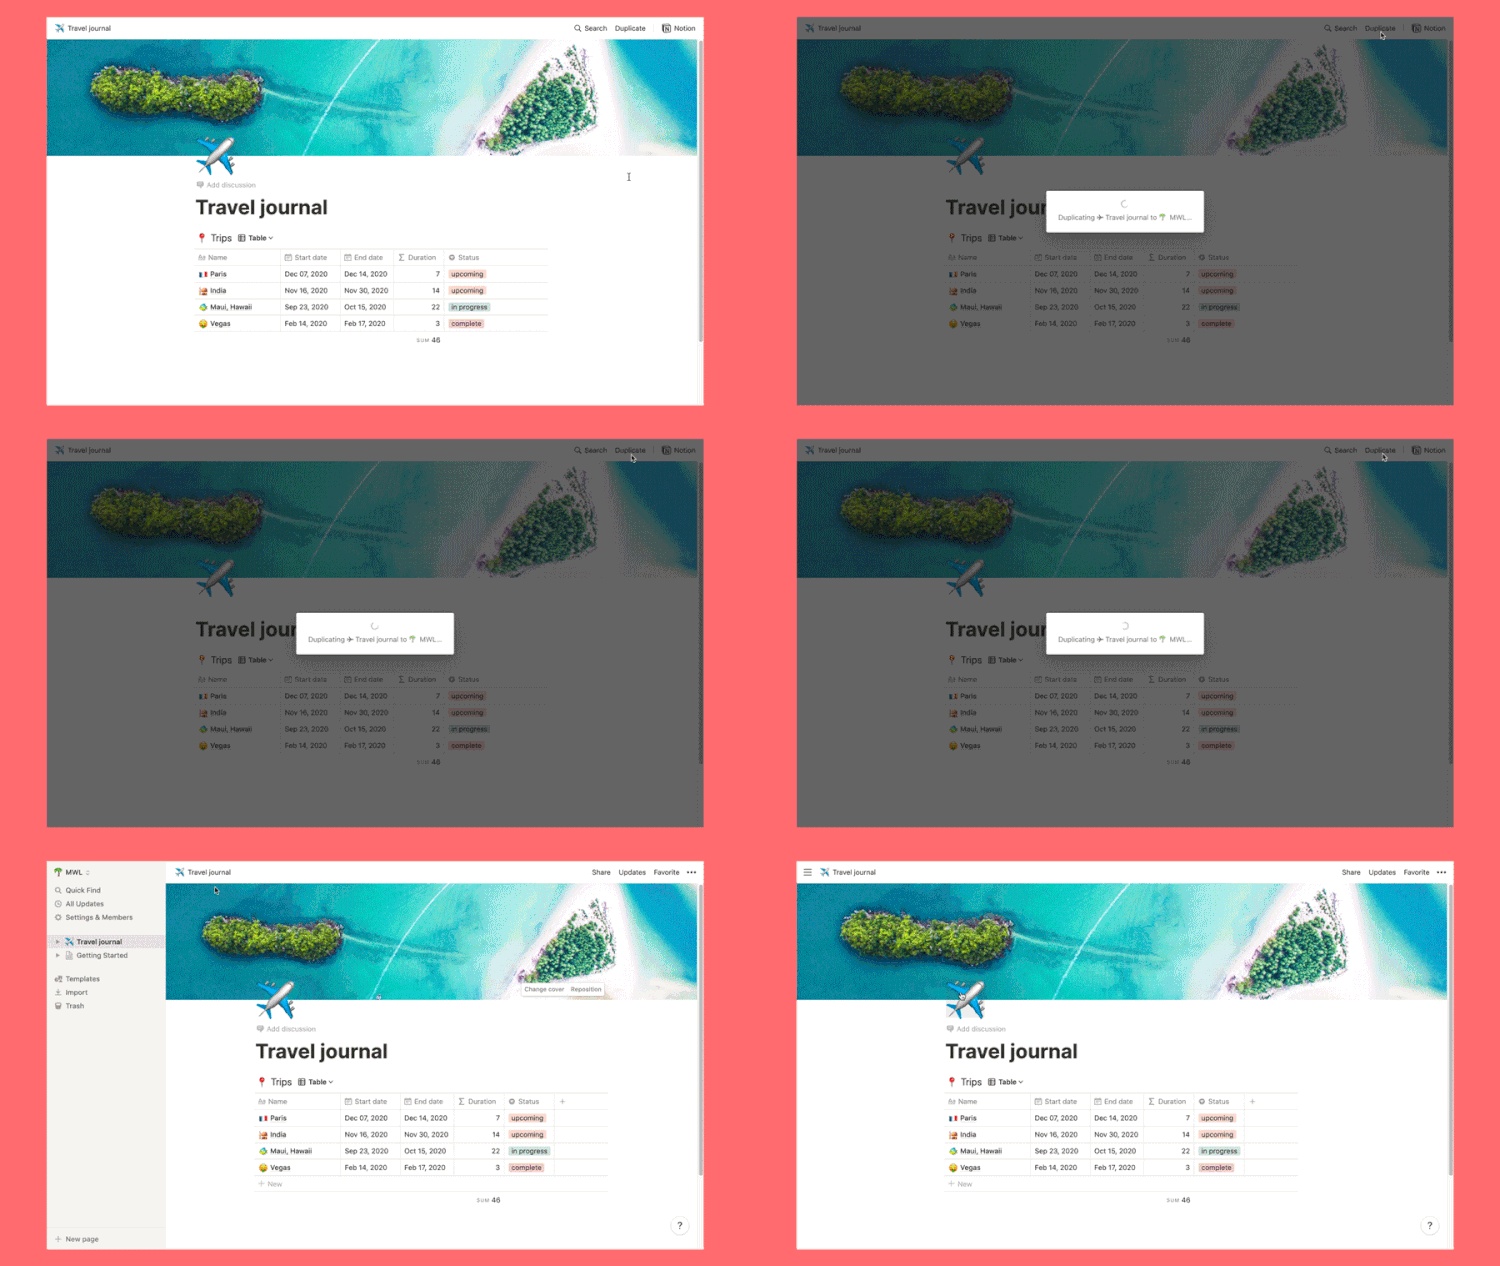
    Once you have an account, the next step is to duplicate the template I have created so you can personalise it and begin planning your travels.

    Click on this link then click “duplicate” in the top right hand corner. If you’ve made an account and are logged in, it will take you to your new travel journal in your own account. If you’re not logged in it will prompt you.
    3. Personalise

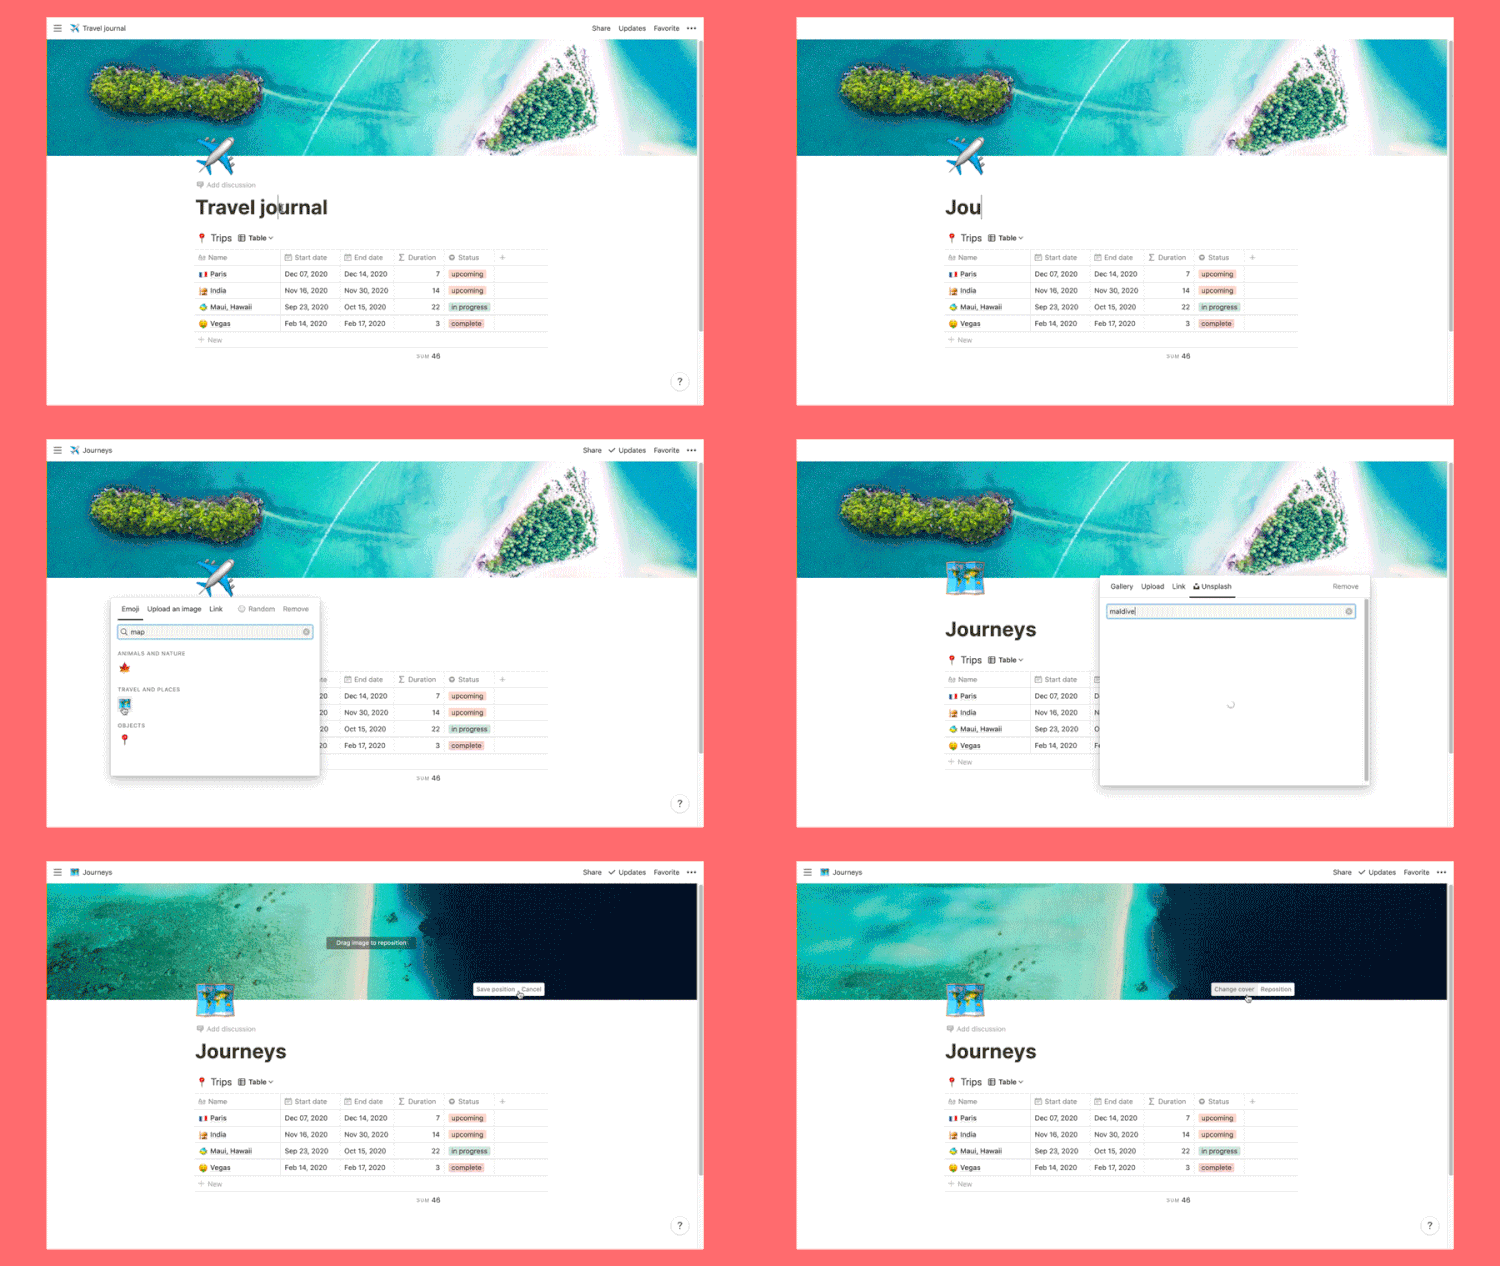
    Time to make it yours! Personalise your travel journal with a new title, emoji and cover photo. Notion hooks up to Unsplash and gives you 900k+ hi res photos to choose from (you can use these anywhere you like not just as header photos).

    Individual trip pages can be personalised in this way as well, in fact any page of your travel journal can!
    4. Explore the template

    Take it for a spin and get familiar with how your trips will be organised. Click on one of the demo trips, Paris for example. Notice each trip has its own page? Inside the trip page you’ll find what I consider key resources for planning a trip: a pre-trip checklist, a packing list, a map (all inspired by Gaby’s previous blog posts), an itinerary, a budget, and a space for any notes.
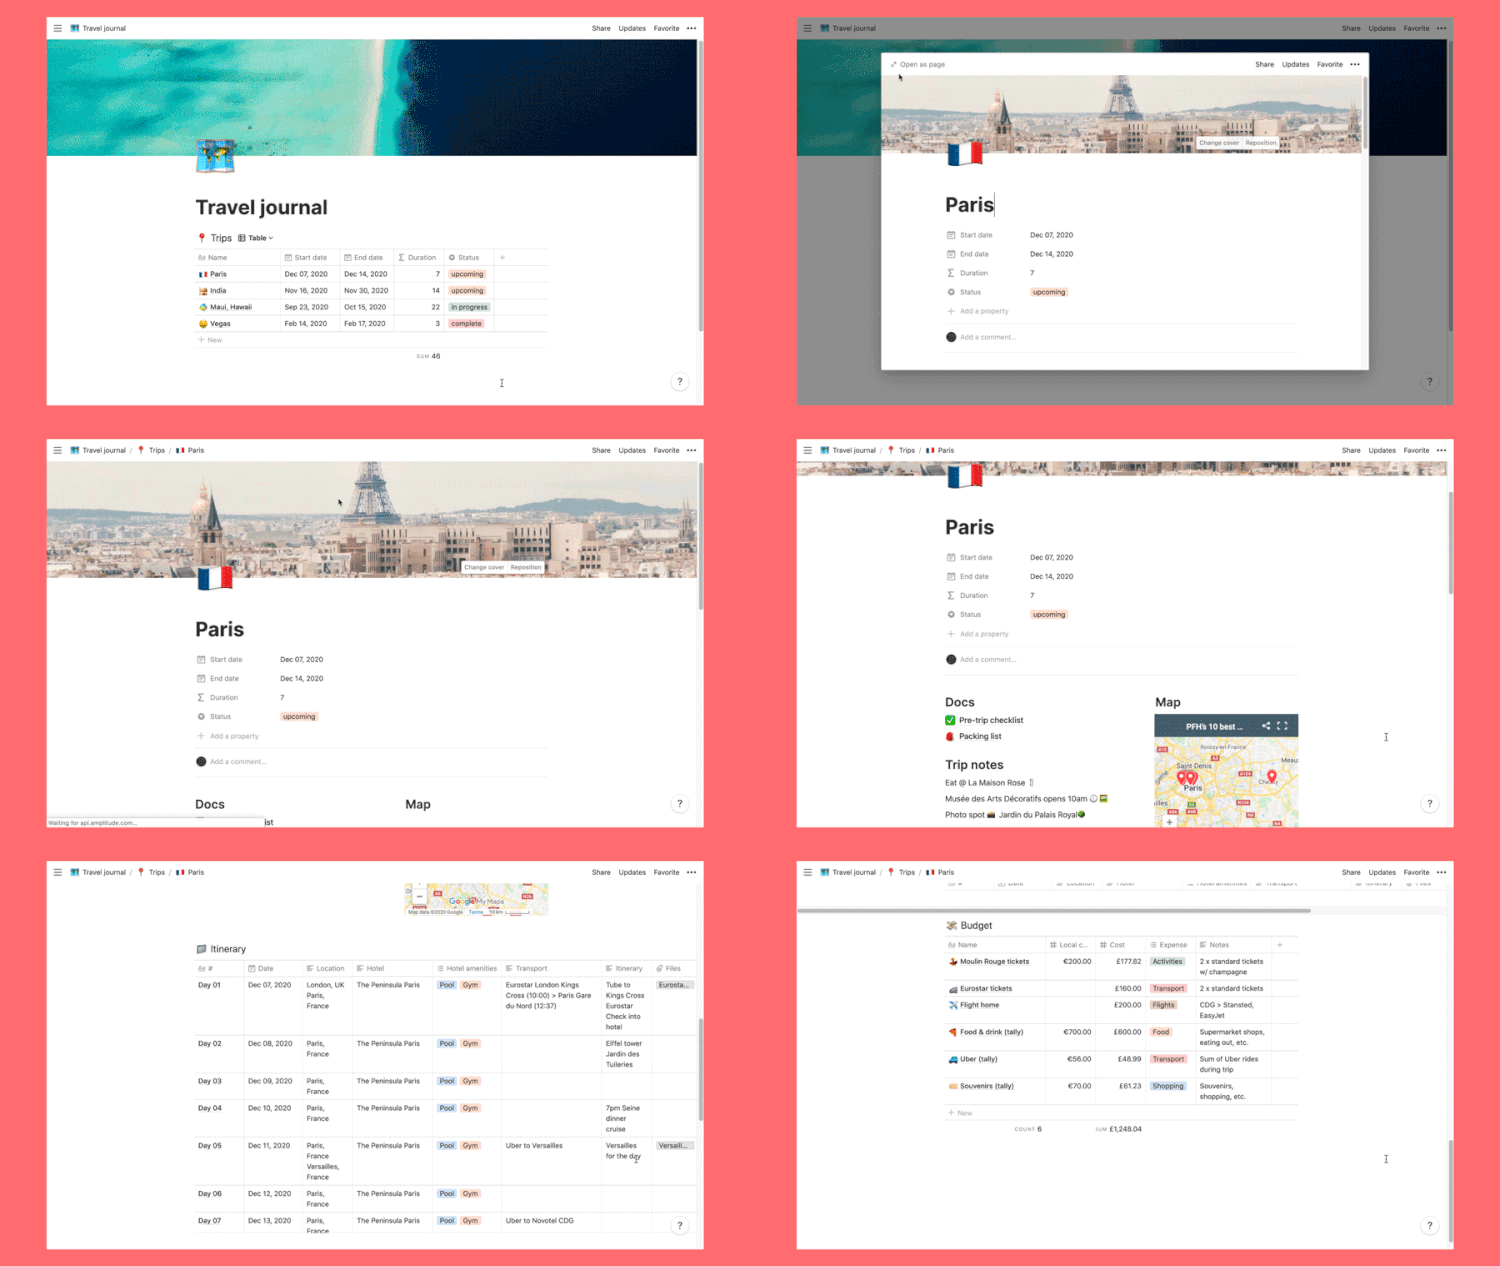
    Here’s a quick breakdown of each section:

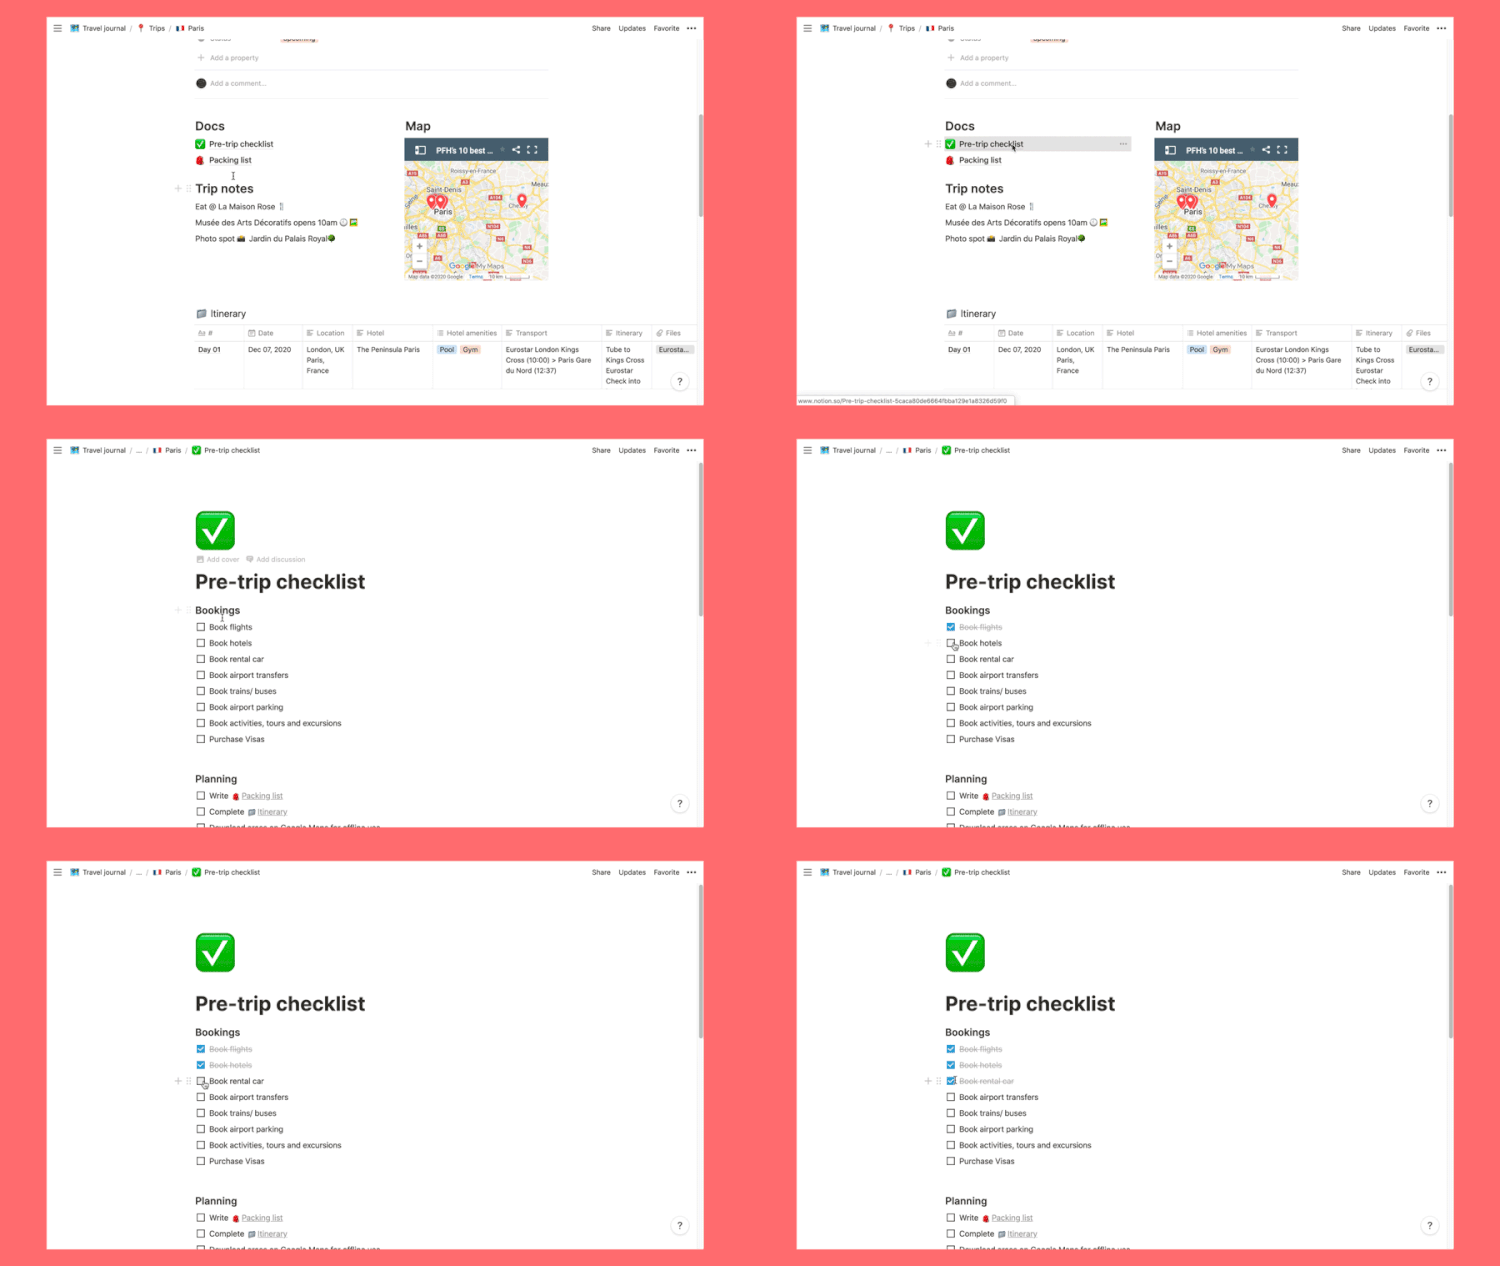
    Pre-trip checklist

    You’ll be able to customise this check list to suit your needs – add to it, take away, rework it.
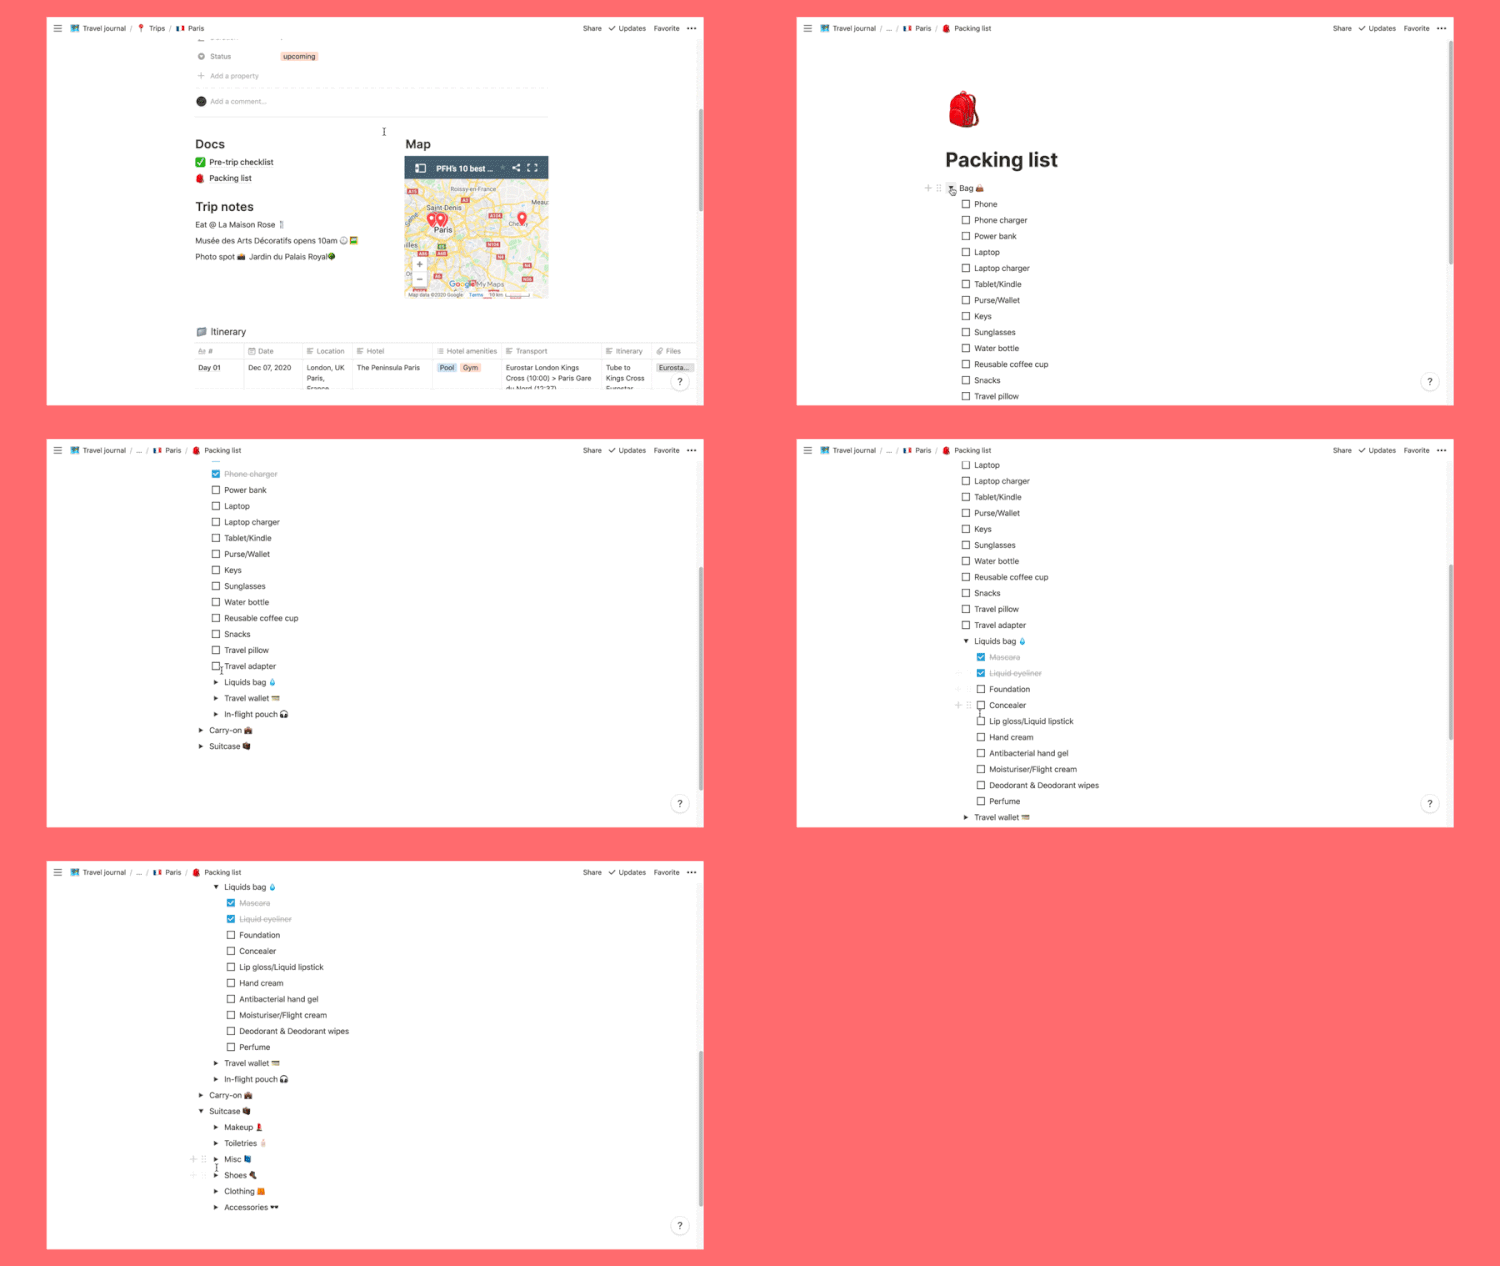
    Packing list

    Again, use ours as a guide or write your own from scratch. Use toggles to organise cases, bags and categories. To add to this list (or any aspect of the travel journal) hover or click on the + and choose what kind of block you’d like to add; there are so many to explore.
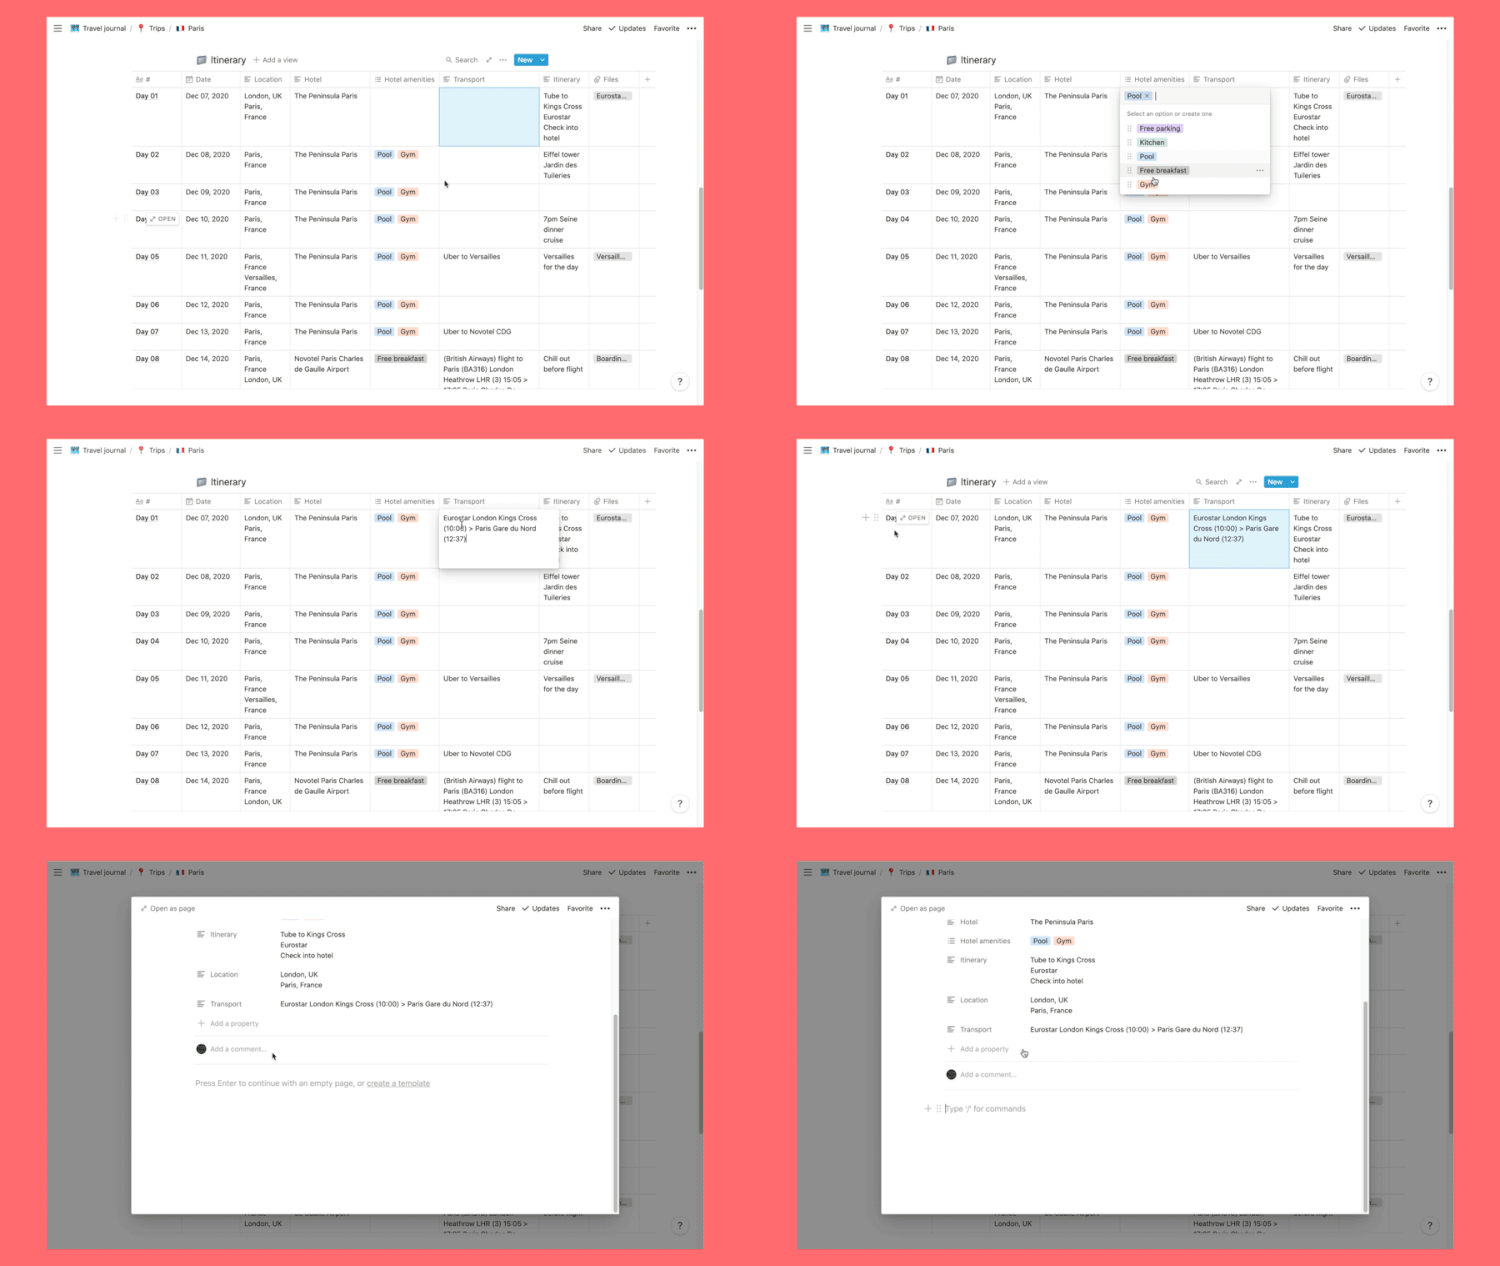
    Itinerary

    The itinerary is set up as another database so it functions just like your main travel journal database – each day can be clicked and is a stand-alone page. This is great if you want more space for each day, maybe you’re a big journaller or want a place to collate some images for a travel shoot moodboard, you can do it all here.

    Customise your columns to suit your needs: fill in your days, drop your boarding pass PDFs in the ‘files’ column on the corresponding day and you have everything for your trip in one place.
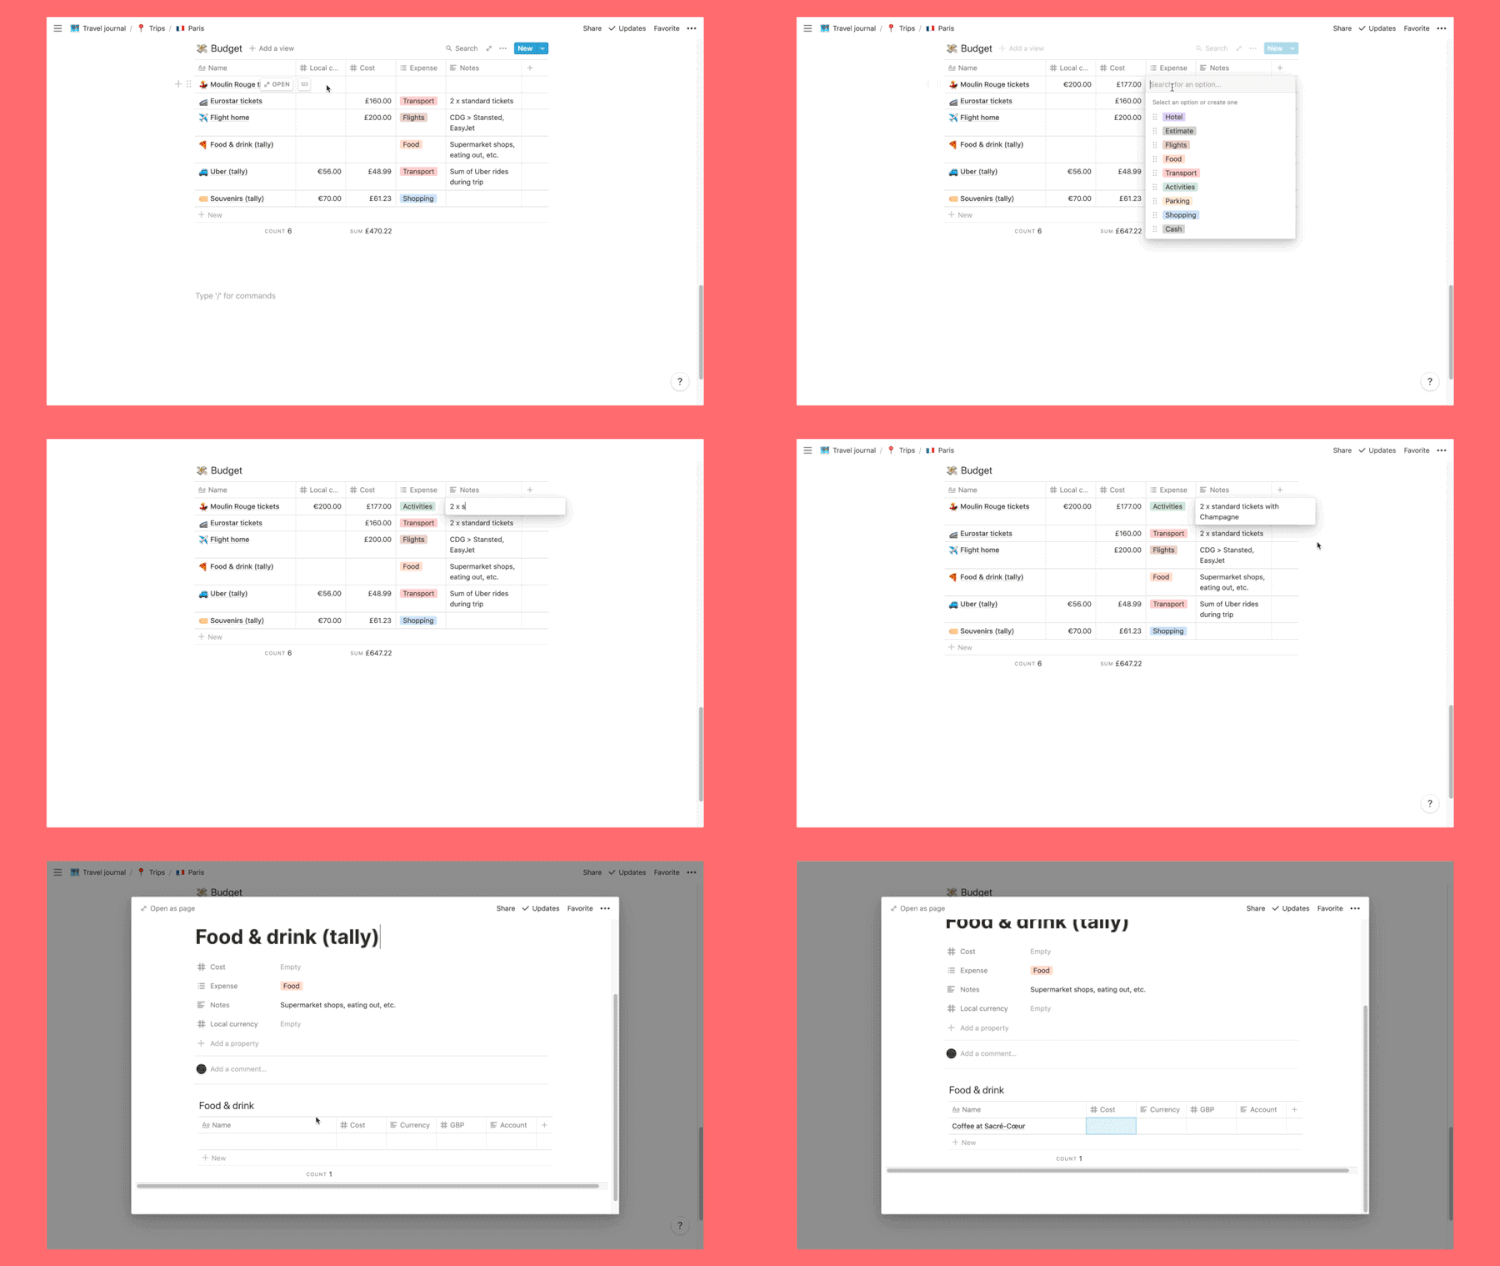
    Budget

    Depending on how organised you want to be you can create a budget – either use this as a plan to keep to your spending limit or a log as you go. You can add single expenses or create more detailed budgets by nesting smaller tallies (see ‘food & drink’) – the possibilities are endless!
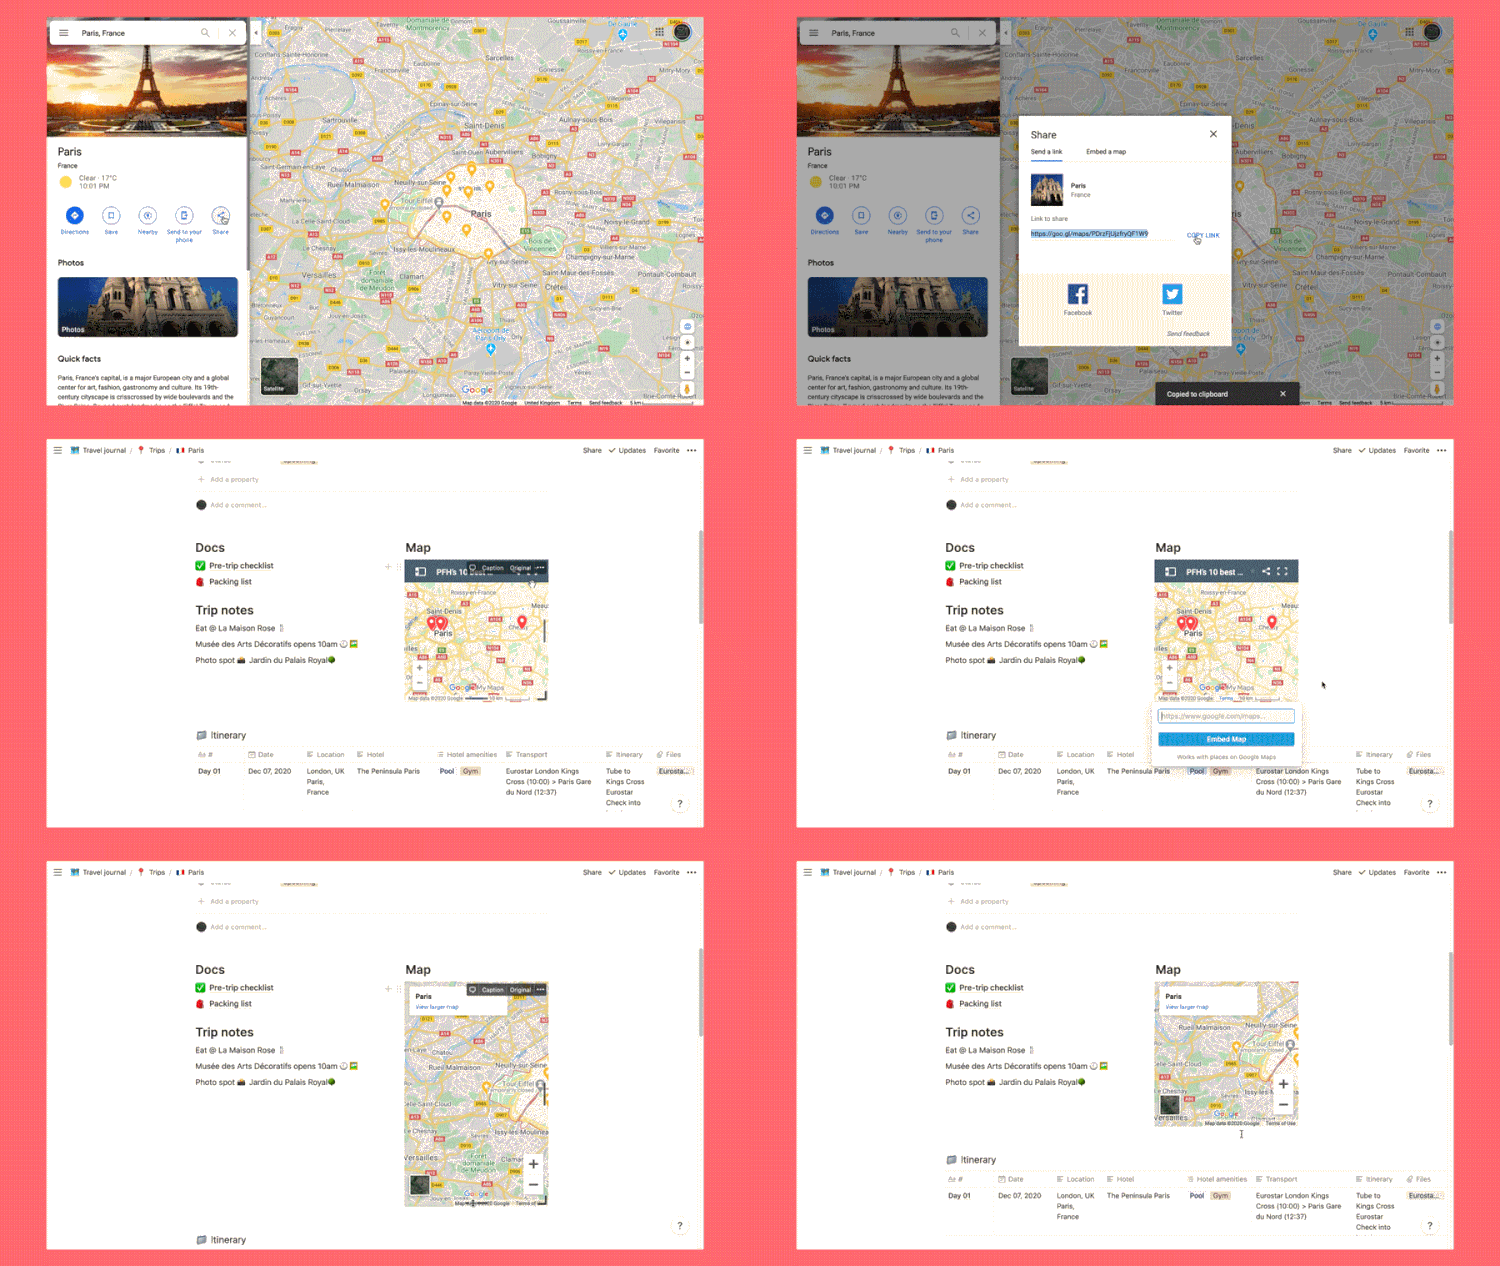
    Map

    Use this space to drop a map of your destination in. It’s a great way to embed pre-made maps with spots you want to visit. Just click on replace in the map menu and paste the link to any Google map.
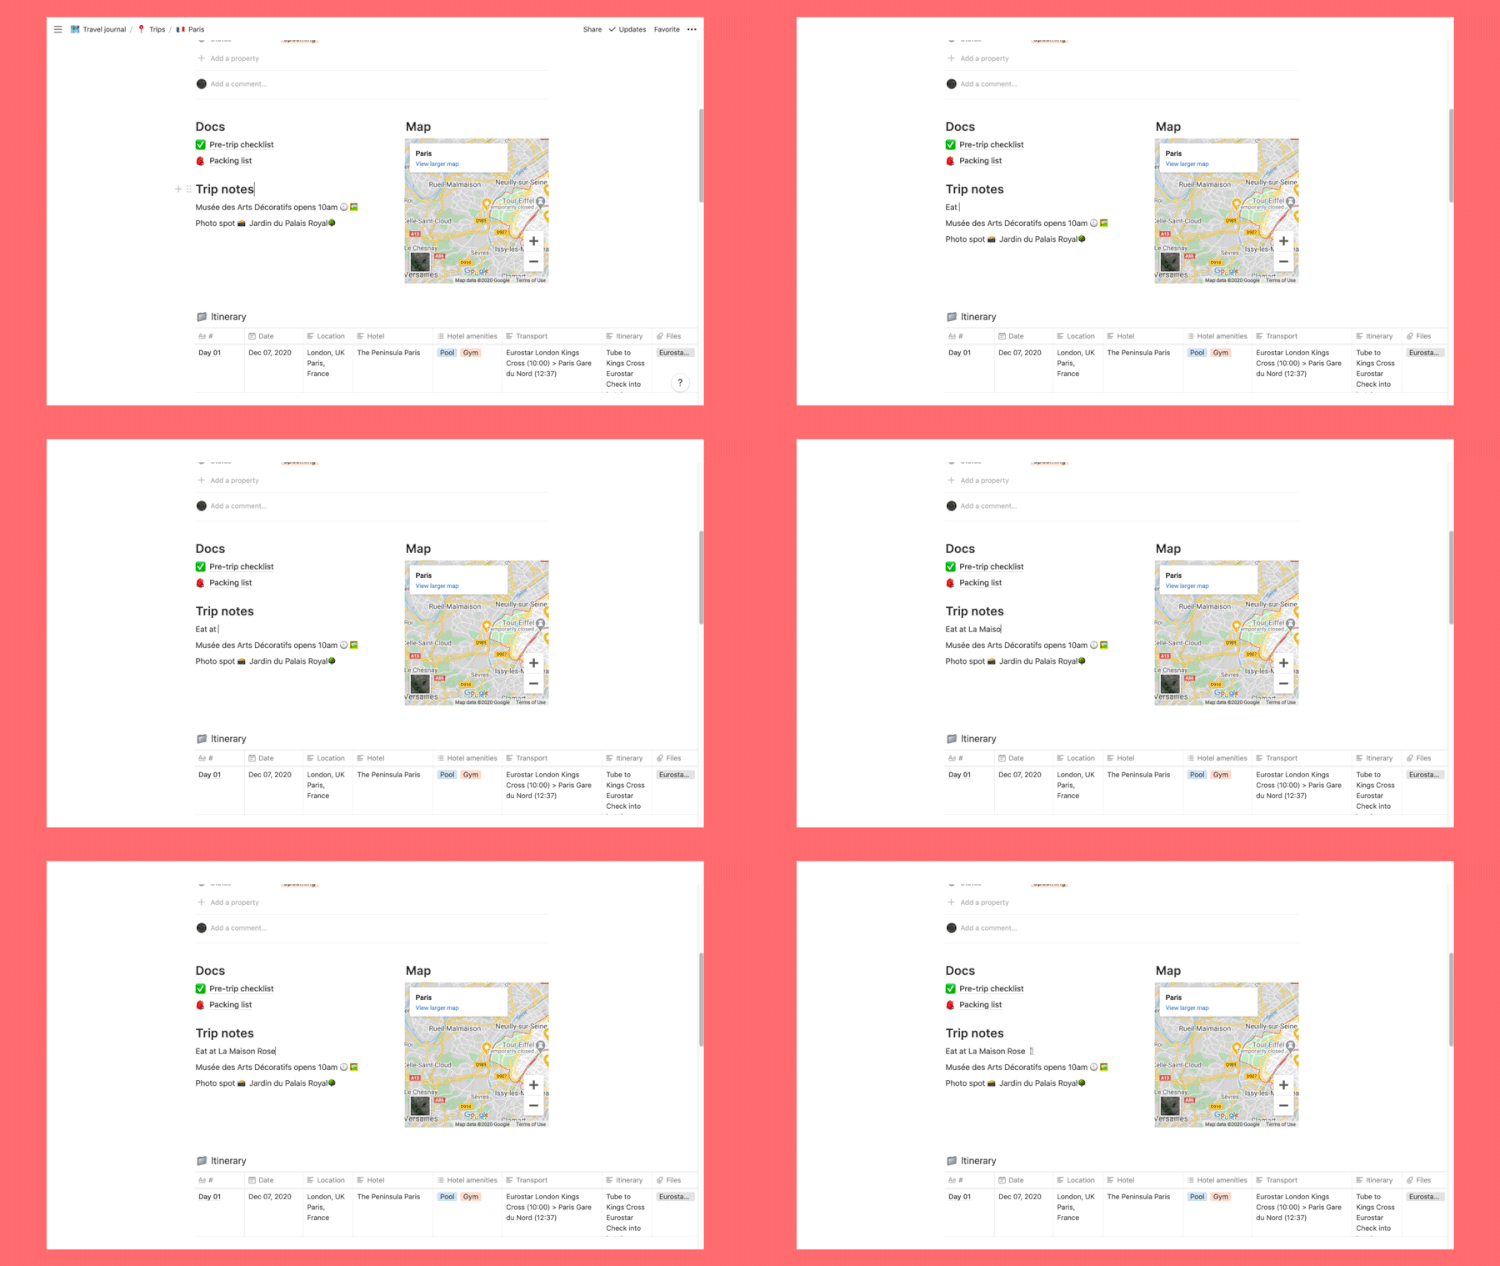
    Trip notes

    A free space for anything that doesn’t have a home above. I like to jot down recommendations we’ve received on our trips or useful details I need to remember like airport parking locations (because I always forget where the car is parked which always leads to an argument in the middle of the carpark with Gaby).
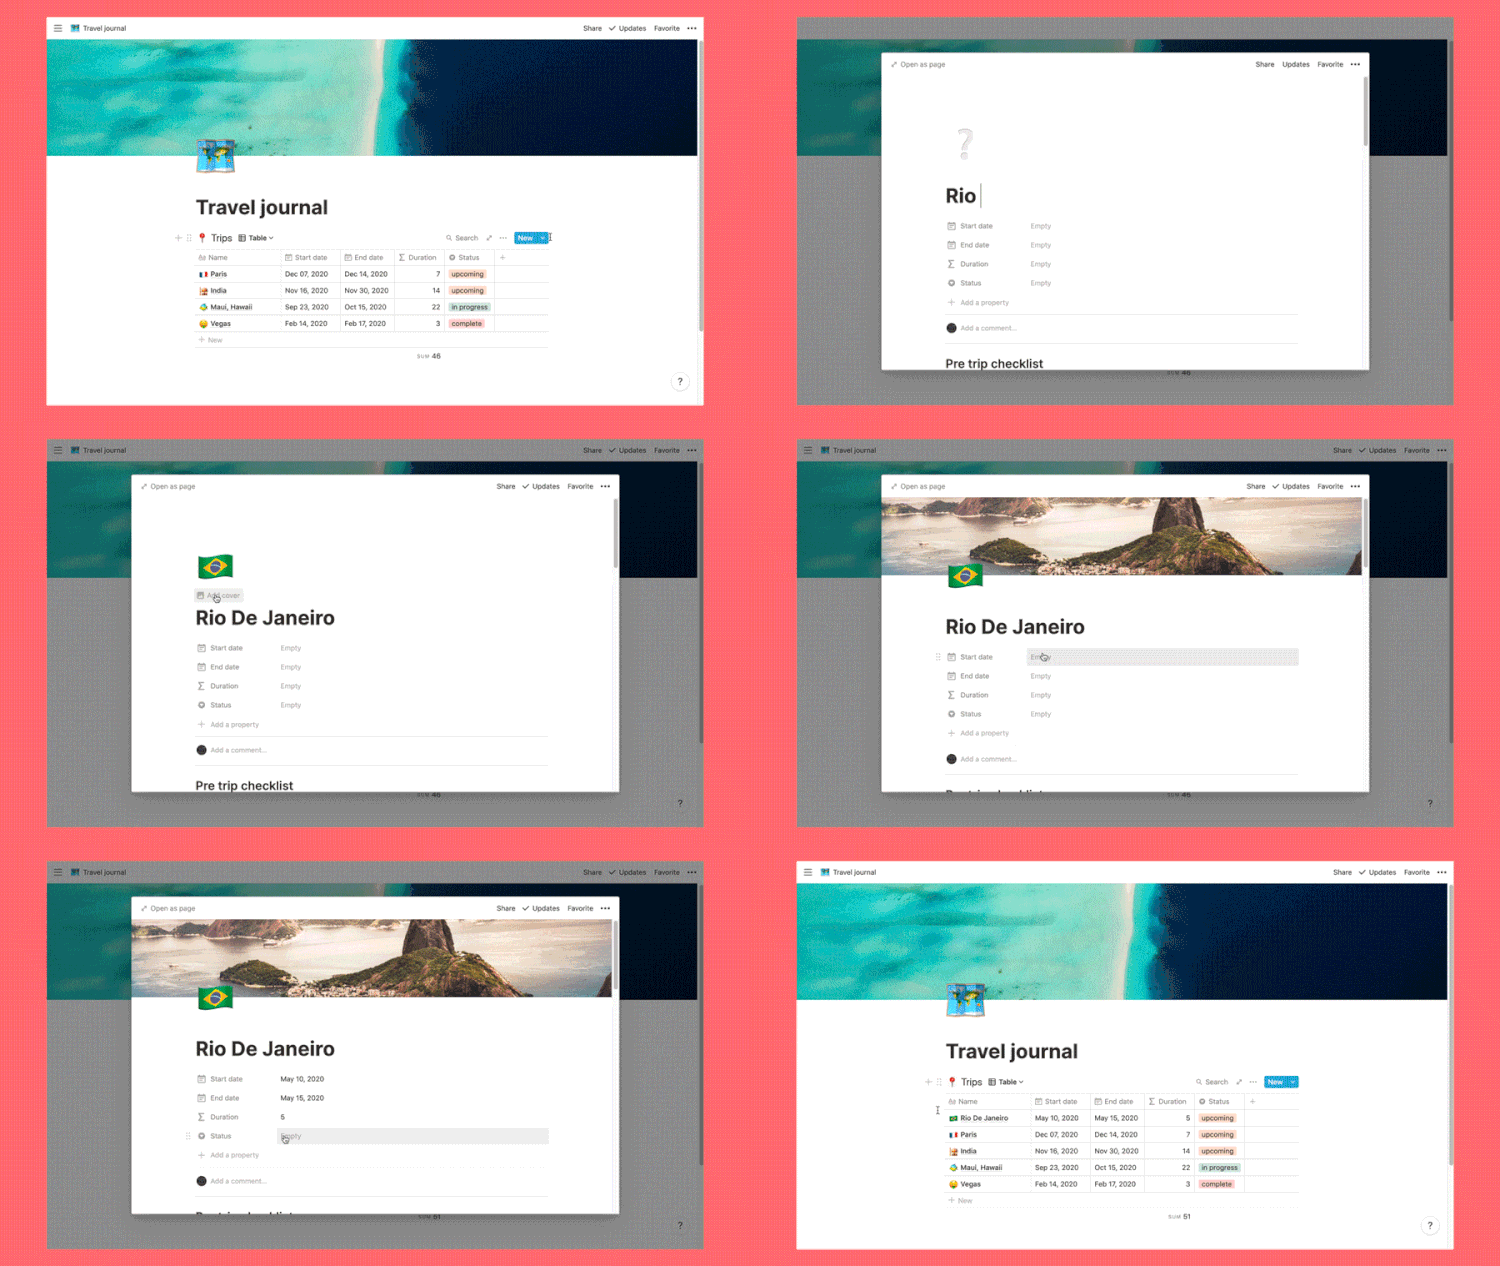
    5. Start planning

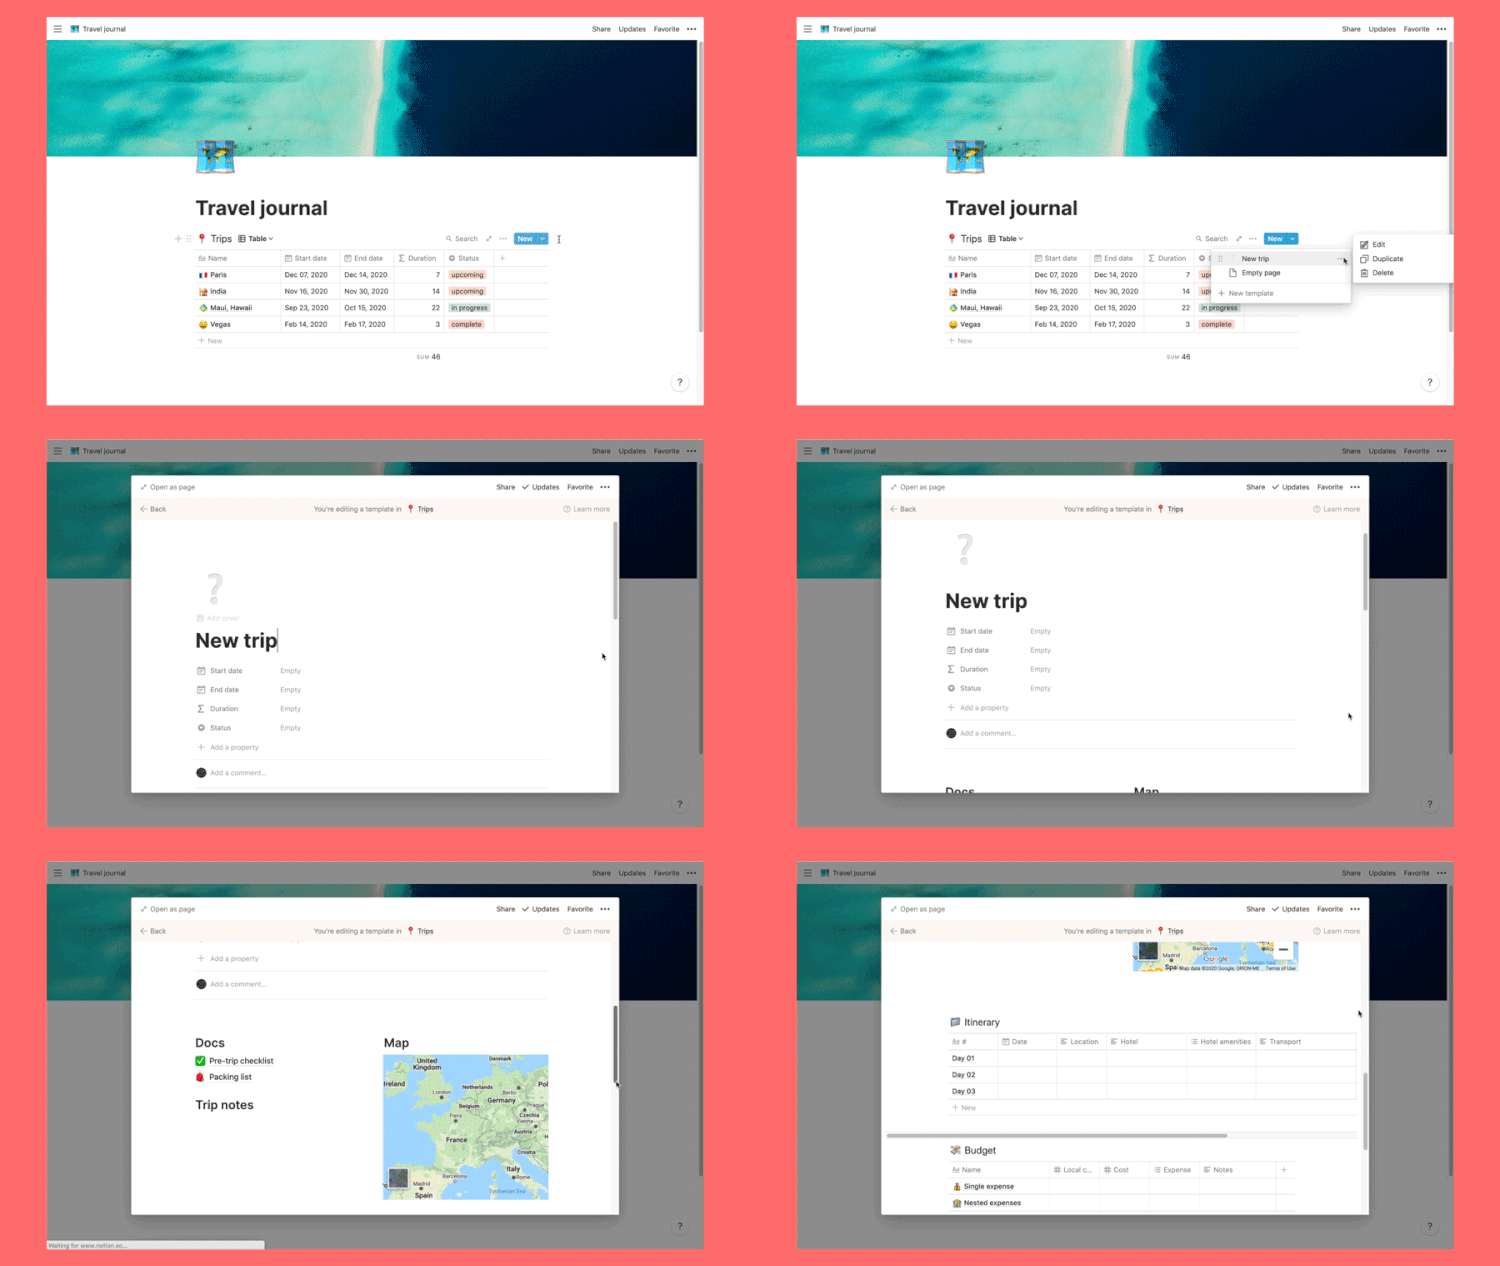
    Time to create your own trip! When you are back to your main travel journal page (use the navigation menu at the top of the page), hover over the trips database, click on the arrow on the blue ‘New’ button and click ‘New Trip’. Title your trip page, personalise the icon & wallpaper and add some details. Back in your travel journal you’ll see your new trip, now you are ready to plan.
    Edit your trip template

    When you create a new trip, you are duplicating a template I have made. If you want to make changes to this template click on the blue arrow of your main database and select edit – any changes you make in here will be active each time you press new trip. This is great if you want to customise your pre-trip checklist or packing list and have the changes reflected for every new trip.
    6. Additional tips

    Explore different views

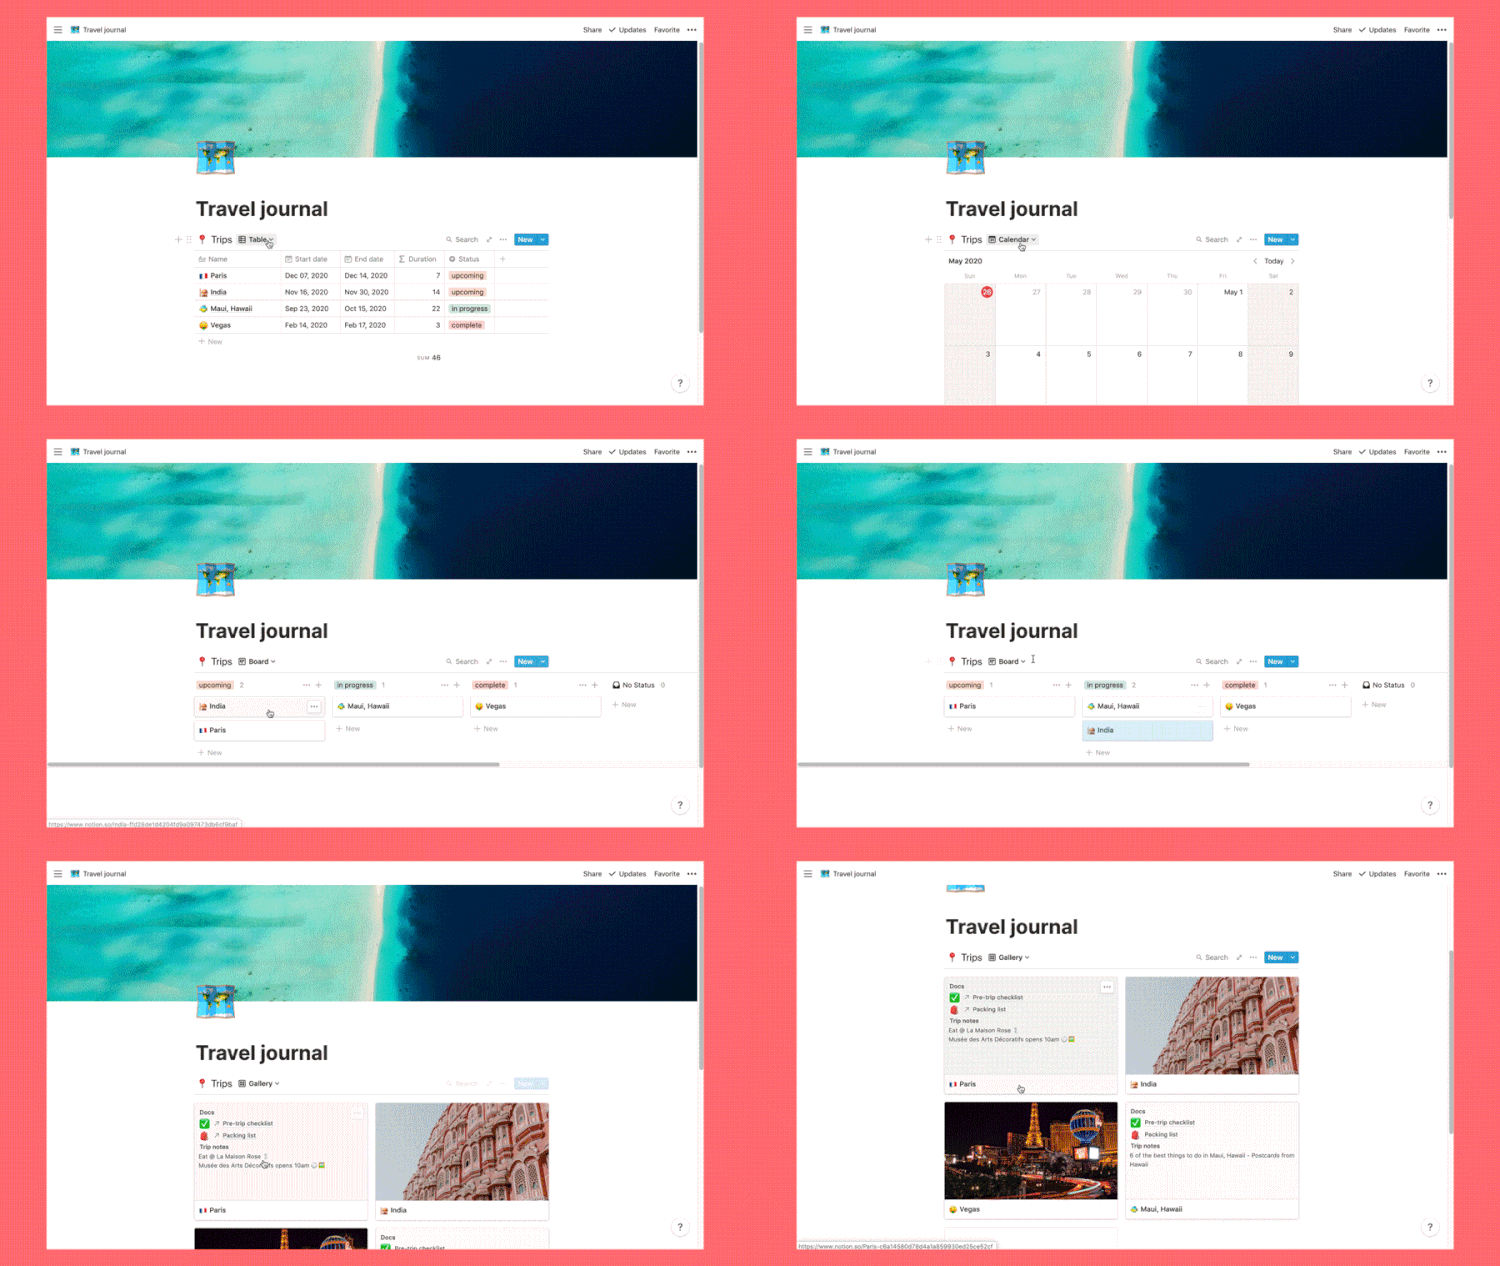
    With any Notion database you can create multiple views. Let’s say you want to see how all your travel plans look on a calendar, you simply click “new view” and then “calendar view”; your trips will appear based on the dates you’ve set. There’s also a “board view” and ““gallery view” – explore your options. You can then toggle between views whenever you like and you can even copy and paste a linked view, so you can see both at the same time while retaining it as one database.
    Add custom columns

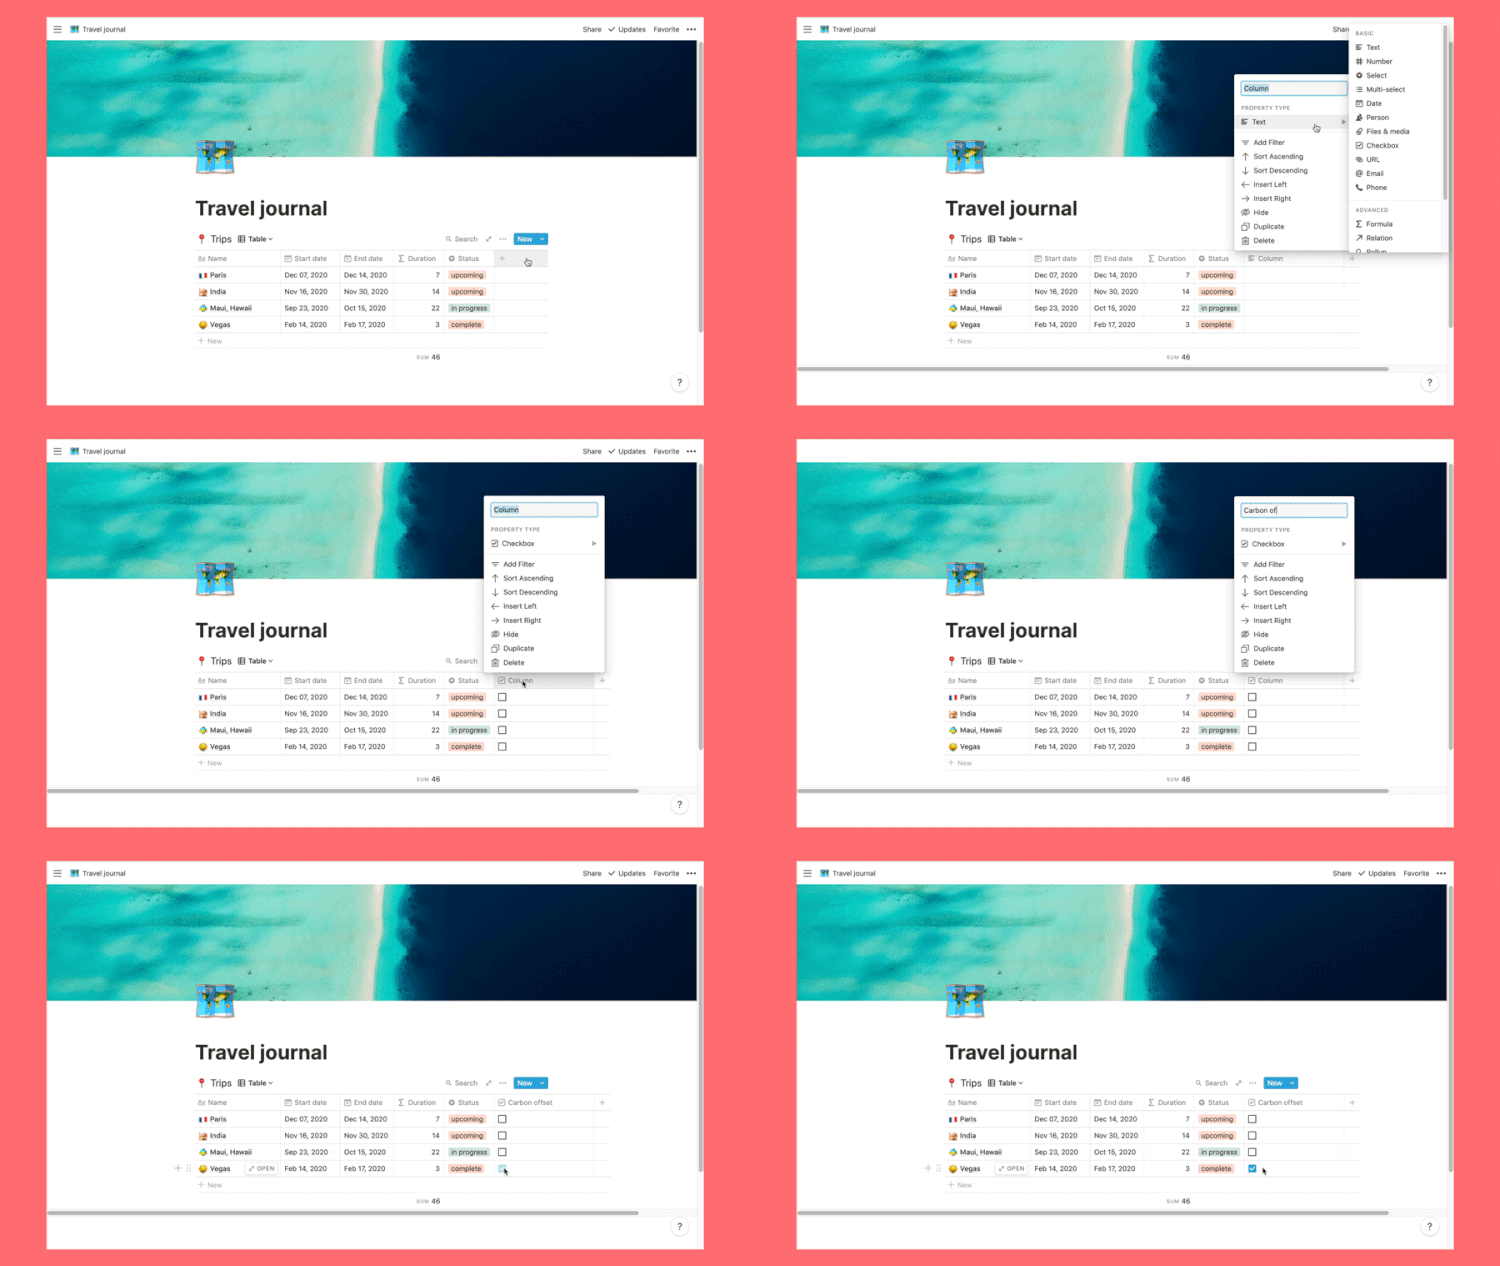
    Add your own columns to your main database for example, a checkbox for carbon offsetting the trip.
    Use filters

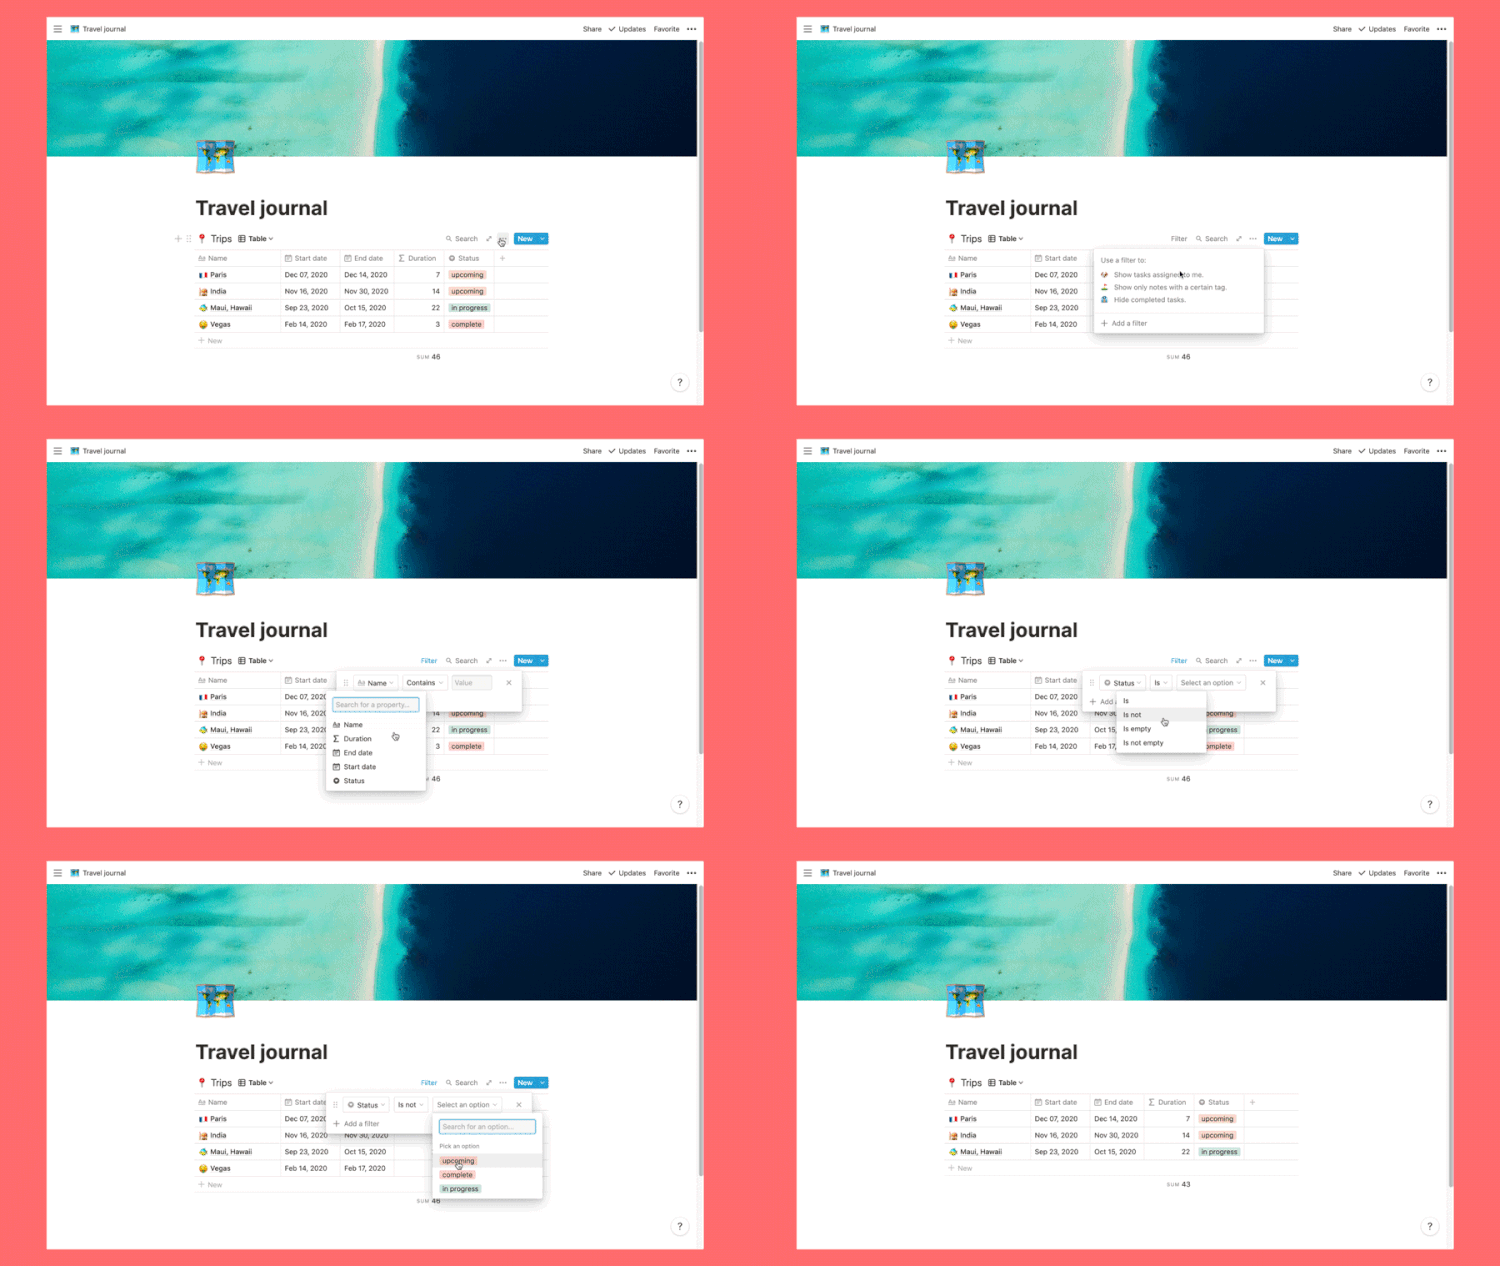
    Filters are a great way to change which trips your database shows without deleting anything. Try adding a filter to hide any completed trips.
    .

    So there’s my introduction into how Notion works as a whole but particularly how it can benefit you most for planning your travels. As you’ve probably gathered by now, every part of what I’ve shown you is customisable so don’t be afraid to explore. We all have different organisation styles and ultimately different travel needs and Notion recognises this by allowing you to plan in a multitude of ways. So what are you waiting for? Make an account, grab a coffee and use this template to start organising all your future travel plans, dreams and soon, your whole life (it’s addictive).

    Thanks for reading!

    Here is the link to the template again

    Aloha, Michael

    Pin this post

  • Packing Guide – What to take on a road trip

    Packing Guide – What to take on a road trip

    I’ve done many road trips over my adult years, but my most recent trip around the West Coast of America has really opened my eyes to how draining and uncomfortable they can be after a while. It all seems good in theory, plotting out routes to get to spectacular destinations. You say to yourself, “it’s only four hours away from this, that’s nothing in comparison to that, we can do it easily!” but eventually it adds up, especially if traffic gets involved, and before you know it you’ve spent 10 hours in the car for one hour’s worth of sight-seeing. 

    It was days like that that made me think about bringing certain items to make the trips more bearable, so with you in mind I’ve put them all together into a check list so that you can road trip in comfort from now on.

    Phone

    Have a whole bunch of playlists downloaded for when the radio gets repetitive, along with your route so that you can get offline directions for where you’re heading. For a great summer playlist check out PFH California road trip mix tape.

    Cables and adapters

    If you’re using your phone to play music, or you have maps up for directions, the battery is going to drain quickly, not to mention if you’re documenting your journey on it too. Most rental cars have a USB port so make sure to bring along your phone charger cable to keep it going on long journeys. If there isn’t a USB port you can buy alternative adapters that plug into the cigarette lighter.

    Water

    Stay hydrated (she says for the one millionth time!). If you’re likely to be in the car for a long time you won’t want to be drinking warm water, so I recommend you get a thermal bottle. To read more about the water bottle I have and why it’s amazing take a look at 7 items to buy to become a more sustainable traveller.

    PFH Top Tip: Ask drive-throughs to fill up your water bottle en route. 

    Reusable coffee cup

    If you’ve read my blog post from the beginning of this month, 7 items to buy to become a more sustainable traveller, you’ll know exactly why it’s so important to stop or cut down on single use plastics. It’s not unreasonable to expect a few coffee stops on long journeys so just think of how much plastic/paper you’ve saved by using your own coffee cup!

    Snacks

    Try to be prepared with food so you can pack up some healthy options. You’ll find it difficult to leave your car to eat when it’s full of your luggage which makes drive-throughs and gas station snacks your best option. Unfortunately they’re not synonymous with healthy options so I urge you to be as prepared as possible.

    PFH Top Tip: Pick up a cheap cool bag to preserve sandwiches etc.

    Heartburn relief

    Gaviscon, Tums, Rennies – take your pick, trust me you’re going to need them if you succumb to those drive-throughs.

    Travel sickness preventatives

    Neither Michael nor I suffer from travel sickness during long car journeys but my brother did when we were young so I am fully aware of the consequences of not being prepared. If you or anyone partaking on your road trip does suffer, you’ll want to bring the medication they usually take for it, Sea Bands (for a non medicated alternative) and paper bags just in case the worst happens – to this day I still can’t get over my brother hurling in my beloved Burt and Ernie backpack.

    Toilet roll

    Grab a toilet roll from your hotel room, you never know how well equipped gas station toilets will be so take some in with you. Plus it’s handy to mop up any accidental spills in the car.

    Hand sanitiser

    Speaking of ill-equipped toilets this will keep the situation sanitary plus you can clean your hands before eating.

    Tissues

    It’s always a good idea to keep tissues in the car not just for blowing your nose but to clean up any unfortunate spills.

    Breath mints

    If you’re stuck in the car for a long time it’s a good idea to have something available for freshening your breath, especially if you’re not driving and are likely to fall asleep it’s a good idea to spare everyone else from your morning breath. I encourage mints over gum here because gum has a higher choking risk, which isn’t ideal if you’re driving. 

    Travel pillow

    On the topic of sleep, if you are the passenger or are taking it in turns to drive, it might be ideal to bring a travel pillow so your neck is supported if you need a nap. To read more about travel pillows check out Travel pillows – who you should be sleeping with.

    Sun cream

    You might be thinking “what is she talking about, how can I can burn inside the car?!” I know it sounds a little crazy at first but humour me for a moment. The sun can still get to you through the windows and unlike when you’re out and about, you can’t escape it in the car once it’s on your side. Studies show that commercial vehicle drivers have worse sun damage on the right side of their face (or left, depending on which country they drive in) from being exposed to the sun whilst driving. To prevent sun damage and any unwanted tan lines make sure to frequently top up your suncream.


    Sunglasses

    To save you from squinting on bright days but also to help you see better when the sun is low in the sky and your visor is too high to block it out. I always keep at least two on me because Michael is terrible for leaving his somewhere unreachable. Of course I have my fun with his forgetfulness and make him wear the novelty ones!

    Towel

    This really depends on where you’re going. If it’s somewhere hot or where it’s likely to rain/snow I suggest keeping a towel to hand to lay over your seat to soak up any excess moisture. It’s not a pretty thought I know, but driving on a hot day can be a sweaty ordeal, especially if the sun is on the driver’s side. A towel will prevent extra discomfort and also protects the seat. I suggest a microfibre towel because a) they are compact and lightweight which is perfect for travel and b) the fabric is super absorbent and quick-dry. I got mine from Mountain Warehouse.

    Change

    Keep a decent amount of change in the car (out of sight to avoid break-ins) for parking and toll fees.

    .

    I hope this checklist proves helpful for any road trips you have coming up. It might seem like a lot to take at first glance but (depending on how many snacks you pack) it will all fit into one bag so it’s not really inconvenient, and trust me it will make those long car journeys a lot more enjoyable/bearable. 

    For inspiration on where you can road trip all around the world, take a look at Your Parking Space’s article The Best Destinations For A Road Trip: Expert Round-up. You might recognise number 22!

    .

    Aloha, Gabriella

    Pin this post


  • My ultimate interactive packing list

    My ultimate interactive packing list

    I love lists! I love lists so much that even my lists have lists. What’s my favourite list I hear you say, well that’s easy, it’s my packing list! The first thing I do once we’ve started to book a trip is draft my packing list, even before I’ve researched what I’m going to do – which of course helps me plan appropriate outfits – I’m diving straight into my template and typing up all the outfits in my wardrobe that I can take with me. Seriously my screen saver is so littered with my packing lists I can barely see Margot Robbie’s beautiful face on my Pan Am screen saver, criminal I know!

    I know it seems eager, but there is method to my mad-lists! without fail my first draft will contain about 30% of items I won’t need, so by starting early I can keep going back to it and taking things out and sometimes replacing them with more practical items, especially after I have started to plan activities. When I am making my packing list I usually put a * next to “maybe” items, this helps me throw things out when I need to whittle it down. If you’re anything like me you will end up buying clothes when you’re away anyway so let’s make room for that!

    In time I have created a template which hasn’t failed me yet. The key to a fail-proof packing list is categories and subcategories. When making a list, nothing is too trivial, include everything and you won’t forget anything. Sounds obvious I know, but my partner once refused to put underwear on his packing list because why would you forget underwear?… Well I’m sure you can guess what we had to do first after checking into our hotel in Brussels… Be specific too, describe the item of clothing with brand, style and colour, for example, “Joules stripy top with gold stars”, it will make a less cryptic list when it comes to packing.

    Check out my interactive packing list below, just one click you will be able to edit and customise your very own*. You can change the destination and replace items with full descriptions of everything you want to pack, just like my example above. If you need help editing it, take a look at the GIFs below, it’s super easy and saves trees, yay!

    In time I will post about what you can pack and wear in different climates and how to adapt your wardrobe to alternative cultures, but for now I’ve kept it general and flight-friendly with items for both male and female ready for you to personalise for your next trip.

    Happy Packing!

    *Customisation requires Adobe Reader and the file may need to be saved first.

    DOWNLOAD


    Edit Packing List

    Customise your list with the destination and exactly what you want to pack.

    Big trip or struggling to pack light? No problem, I’ve got you covered! Use the scroller to view all your items.

    If you want to copy it into your preferred planning assistant/app, you can export the list to plain text and paste it wherever you want.

    .

    Let me know if you found this helpful or if you think I missed off something we would die without!

    Aloha, Gabriella

    Pin this post