Tag: Recipes

  • Homemade & low-waste travel snacks

    Homemade & low-waste travel snacks

    Learn how to make snacks using store cupboard items and vegetable scraps to save waste and make something tasty that you can take on your travels for when you feel peckish. In this blog post I’m going to show you how you can turn potato skin peelings into potato crisps/chips without deep frying them, how to roast chickpeas to turn them into flavoursome crunchy bites and how to turn bulk-buy (save that plastic) corn kernels into popcorn! Yum!

    All of these snacks can be stored in a tiffin or a reusable freezer/zip-lock bag to keep them fresh when you’re travelling or out and about.

    Whether you’re travelling or not, these following three recipes will help you to reduce your plastic consumption and save you from throwing out food by composting it when you could eat it!

    Before I share these really simple recipes I’ll answer a few questions you may have about them:

    Are these small homemade snacks suitable for children?

    These recipes for roast chickpeas, popcorn and potato skin crisps/chips are suitable for children who are over the age of 5 years old. As guided by the NHS website small snacks such as popcorn are a choking hazard for children under the age of 5. Also be mindful of how you season these homemade snacks as young children should not eat sugar to prevent tooth decay or salt to prevent kidney failure.

    Above the age of 5 and with reduced sugar and salt these snack recipes are suitable for children.

    Why are these plastic-free snacks better for the environment?

    These homemade snack recipes are plastic-free as it’s possible to buy potatoes, chickpeas and corn kernels without any packaging and if you’re not used to buying dry chickpeas you can buy them in an aluminium can which can be infinitely recycled. 

    Reducing your single-use plastic consumption can help keep plastic out of our oceans and landfills saving wildlife from accidentally ingesting it and it can work towards a reduction in the need for single-use plastic production which will reduce the need for fossil fuels and production of poisonous greenhouse gasses. 

    Sure, making homemade snacks won’t save the planet right away but every little positive change we make will always help towards it. Don’t give up the good fight and remember the most sustainable thing you can do right now is to use up what you have first.

    Can I take these homemade snacks on a plane?

    Yes you absolutely can take homemade snacks on a plane. Check your destination for specific rules on what food products can be brought in just in case you don’t end up eating them in transit.

    I travelled to Europe with my roast chickpeas and popcorn in reusable freezer bags.


    Homemade potato skin crisps/chips recipe

    How much will this recipe make?

    At least two large potatoes will serve two people.

    How long will these potato skin crisps/chips keep?

    These potato skin snacks are best eaten warm and out of the oven but if you leave them to cool down completely before storing them they will last one day.

    How long will it take to make potato skin crisps/chips?

    It takes an hour to prepare and cook these potato skin snacks.

    What you need to make potato skin crisps/chips

    Baking tray/sheet

    Tablespoon

    Teaspoon

    Sharp knife or vegetable peeler

    Homemade potato skin crisps/chips ingredients 

    2 large potatoes

    2 tbsp oil

    Salt & pepper

    1 tsp paprika (optional)

    1 tsp garlic powder (optional)

    How to make homemade potato skin crisps/chips


    1. Pre-heat the oven at 200°C/392°F (fan assisted).


    2. Peel the potatoes cutting a little deeper than you usually would – this will prevent the crisps/chips from burning as it makes them thicker.


    3. Add peelings to a baking tray/sheet.


    4. Drizzle the oil over the skins.


    5. Season with salt, pepper and any seasoning of your choice. I like to use paprika and garlic but you can use anything. This time I used Everything-but-the-bagel seasoning from Trader Joe’s which works well too!


    6. Pop the tray/sheet into the oven on the middle shelf and cook for 40-45 minutes, check after 35mins to be sure they’re not burning – if you peeled them thick then they’ll take slightly longer.


    7. Allow to cool for a moment and serve or cool completely and store for later or the next day.


    Homemade roasted chickpeas recipe

    How much will this recipe make?

    One tin of chickpeas will make 4 servings.

    How long will these roasted chickpeas keep?

    These roasted chickpeas will last about 5 days in a fridge or 2 days stored dry.

    How long will it take to make roast chickpeas?

    It takes 40mins to prepare and cook these roast chickpeas (if you use canned chickpeas).

    What you need to make roasted chickpeas

    Baking tray/sheet

    Tablespoon

    Teaspoon

    Homemade roasted chickpeas ingredients 

    1 tin of chickpeas

    1 tbsp oil

    Salt & pepper

    1 tsp paprika (optional)

    1 tsp garlic powder (optional)

    How to make homemade roasted chickpeas


    1. Pre-heat the oven at 200°C/392°F (fan assisted).


    2. Drain the chickpeas and put them on the baking tray/sheet – save the chickpea water from the can as you can use it as a vegan egg alternative for baking, 3 tbsp of chickpea water (aquafaba) is 1 egg.


    3. Drizzle the oil over the chickpeas.


    4. Season with salt, pepper and any seasoning of your choice. I like to use paprika and garlic but you can use anything.


    5. Pop the tray/sheet into the oven on the middle shelf and cook for 30 minutes.


    6. Allow to cool for a moment and serve or cool completely and store for later.


    Homemade popcorn recipe

    How much will this recipe make?

    ⅓ cup of corn kernels will make one large bowl of popcorn.

    How long will homemade popcorn keep?

    You can store homemade popcorn in an airtight container or reusable freezer bag for up to one week.

    How long will it take to make homemade popcorn?

    It will take around 15 or less to make popcorn.

    What you need to make popcorn

    Large saucepan with lid

    Tablespoon

    Homemade popcorn ingredients 

    40g (⅓ cup) corn kernels 

    3 tbsp oil

    1 tbsp salt or cinnamon or sugar (optional)

    How to make homemade popcorn


    1. Heat the oil in a saucepan on a medium heat.


    2. Add 4 kernels to the heated oil and cover the pan, when those kernels pop add the rest of them and cover but lift the saucepan off the heat for 30 seconds.


    3. Place the saucepan back on the heat, with the lid left slight off centre for the steam to escape, until the corn pops. Once the corn starts popping shake the saucepan to even distribute the un-popped corn across the bottom of it.


    4. Once the popping slows down, tip the popcorn into a large bowl and season with your choice of flavour.


    5. Allow the popcorn to cool down completely before storing in a tiffin or reusable freezer bag.


    .

    Bon appétit! I hope you enjoy these quick and easy snacks that you can make from home to save waste.

    Do more on and for the planet, Gabriella

    Pin this post


  • Mauritian napolitaine biscuit recipe (gateau napolitaine recette Mauricien)

    Mauritian napolitaine biscuit recipe (gateau napolitaine recette Mauricien)

    Napolitaines are traditional Mauritian biscuits. They are round, flaky shortbread biscuits (cookies) that are sandwiched together in pairs with jam between them and coated with a thick, bright pink icing. Though the shortbread is savoury, the jam and icing make napolitaines a very sweet treat.

    Napolitaines are one of the first things I seek out when I visit Mauritius, they’re like home a comfort to me. They’re one of my favourite Mauritian treats and so I want to share them with you.

    Before I share the recipe I have answered a few questions you might have about making napolitaine biscuits but if you want to skip straight to the recipe, feel free to do so.

    How many napolitaine biscuits/cookies does this recipe make?

    This recipe will make approximately 30 napolitaine biscuits.

    How long does it take to make Mauritian napolitaines?

    Making the dough for napolitaines will take approximately an hour and they take 22-25 minutes to bake (keep in mind that you may need to bake in batches too). They take about an hour to cool fully and it will take between 10-20 minutes for you to add the jam. Icing could easily take an hour and a half or more and for the best results you should leave them out to dry overnight so the icing sets completely. 

    I start making my napolitaines 2 days before the day I will be serving them. They take a little planning but they’re worth it.

    Which jam goes in Mauritian napolitaine biscuits/cookies?

    Traditionally guava jam goes into napolitaines but depending on where you are in the world, guava jam might not be the easiest to get hold of, it certainly isn’t in England. So I use either my homemade raspberry or strawberry jam to go in the middle of my napolitaines.

    Can napolitaine biscuits be made dairy free or vegan?

    Mauritian napolitaine biscuits (cookies) are already vegetarian. To make them dairy free/vegan you just need to swap out the butter for vegan butter or dairy free margarine and the milk that goes into the icing can be swapped out for a plant based milk alternative. I have actually used vegan margarine and soy milk to make these napolitaines in this recipe.

    Can napolitaine biscuits be made gluten free?

    I have tried to make gluten free napolitaines but the dough was just too dry and kept falling apart. Gluten free flour is very dry and due to the already crumbly nature of the shortbread the dough just wouldn’t hold together to be able to roll it out.

    Ingredients for making Mauritian napolitaines


    • 500g (3 cups + 2 tbsp) plain flour (plus a little extra for rolling)


    • 360g (1 ½ cups) butter or vegan margarine (room temp)


    • Pinch of salt


    • 8-10 tbsp jam


    • 500g (3¼ cups + 3 tbsp) icing sugar


    • 80ml milk or plant based milk alternative


    • ½ tsp pink food colouring (paste will give you the best colour)


    What you need to make Mauritian napolitaines


    • Measuring cups or scales


    • Large mixing bowl


    • Small mixing bowl


    • Rolling pin


    • Round cookie cutter 5cm or 2” wide


    • 2 Baking trays


    • Cooling rack


    • Whisk


    • Spoon


    How to make Mauritian napolitaines

    1. Pre-heat the oven to 180°C or 356°F (fan oven).

    2. Sieve the flour into a large mixing bowl and add a pinch of salt.

    3. Combine the butter and flour to resemble breadcrumbs then continue to bring them together to form a crumbly dough. If it’s a real struggle to get it to come together then add a knob more of butter.

    4. Leave the dough to rest for 15mins at room temperature.

    5. Split the dough in half, take one half and roll it out on a lightly floured surface to a thickness of 0.5cm (a little under a ¼”).

    6. Cut an equal number of cookies using a round cookie cutter and repeat for the other half of the dough .

    7. Place the Napolitaine biscuits on baking trays and bake on the middle shelf of the oven for 22-25 minutes. You want them to be pale in colour, not golden, but baked through. You may need to bake in batches as you might not get them all in the oven.

    8. Place the Napolitaine biscuits on a cooling rack and allow to cool fully, this should take approximately an hour.

    9. Once cool, apply a teaspoon of jam to the centre of half of the Napolitaine biscuits (cookies) then take each top and press them upon the ones with jam, wiping away any jam that spills out.

    10. Add the ½ tsp of pink food colouring to your milk and stir until it looks like strawberry milk. With your icing sugar in a large mixing bowl, begin to add the pink milk gradually, whisking in-between pours. You don’t want to add all the milk right away as you want the consistency of the icing to be thick, you might not need to add all the milk. The ideal consistency should be that when you lift your whisk with icing, the icing that pours off sits for a moment on top of the rest before settling in – see the photo below for reference.

    11. Place a plate, greaseproof (parchment) paper or a baking tray under the cooling rack before coating the Napolitaine biscuits with icing.

    12. Spoon the icing over a Napolitaine biscuit, holding it still over it until the icing has run all over the Napolitaine biscuit. You want the top and sides to be coated in icing so continue to do this until each one is fully coated.

    13. Leave the icing on the Napolitaines to dry fully, it’s best to do this overnight as they need to be dry to the touch then they’re ready to eat.


    Bon appétit! 

    Do more on & for the planet, Gabriella

    Pin this post


  • 6 tea infused drink recipes with Coconut & Cotton

    6 tea infused drink recipes with Coconut & Cotton

    If you’re looking for refreshing, tea infused chilled beverages with reduced sugar then you’re in the right place.

    I’ve teamed up with plastic-free and planet-loving shop Coconut & Cotton again to bring you six ways you can enjoy your loose tea chilled this summer. When temperatures rise it’s difficult to sip on a hot cup of tea right? So I’ve come up with six recipes for drinks that have been infused with loose tea so you can still enjoy the health benefits and flavours of loose tea but in exciting new ways. In this post you will find the recipes for the following  six alcoholic and non-alcoholic tea infused recipes:


    1. Iced tea


    2. Agua de Jamaica


    3. Mango sorbet green tea punch


    4. Hibiscus margarita


    5. Mango and raspberry green tea mocktail


    6. Hibiscus champagne cocktail


    These recipes use either Coconut & Cotton’s Mango sorbet green tea or Pure hibiscus tea but you can swap the tea for your favourite flavour of herbal or fruit loose tea.

    For more content featuring Coconut & Cotton check out How to have an earth-conscious spa day at home, How to make handmade loofah soap, Eco-conscious period packing list and Sustainable stocking fillers for travellers.

    Why loose tea is better for the planet

    Research by the University of East Anglia shows that half of the UK’s leading tea brands make their teabags with a non-biodegradable plastic skeleton. These polypropylene teabags mean the teabag will hold its integrity as the tea brews but for the sake of a few more minutes in a mug these teabags will sit on the planet for hundreds of thousands of years. With Brits collectively drinking approximately 36 billion cuppas per year it’s easy to see why switching to loose tea is an important yet super easy sustainable switch which massively reduce tea drinker’s single-use plastic consumption.

    Unlike all the single-use teabags on the market shelves, loose tea has the potential to be steeped a second time – sometimes more! – and we all know that if it’s reusable it’s better for the planet, right? Simply remove your tea infuser, with leaves still inside, and place in a mug ready for your next cup of tea. This article by Tea How details some important questions such as which tea leaves can be brewed again, for how long and how many more times.

    Why loose tea is a better cuppa than teabags

    Ever wondered why tearooms serve you a teapot with loose tea rather than teabags? It’s not just because it looks hella fancy, it’s also because loose tea provides a better brew. 

    Mass-manufactured teabags tend to be made with lower quality tea leaves and often lose their flavour and freshness when they’re broken into such tiny pieces. When brewed, loose tea leaves expand letting in more water to extract their full flavour giving a much more rounded and intense taste.

    This insightful article by Mental Floss on how long to steep your tea depending on your preference of flavour and health benefits.

    Shop Coconut & Cotton’s loose tea

    Plastic-free shop Coconut & Cotton sells over 30 flavours of loose tea. The range covers herbal, fruit and black teas and will see you through from your first cup of Good Morning Blend at the start of the day right to a calming cup of Sleepy Herbal before bed.

    Some of my favourites include the English Breakfast, Rose Earl Grey black tea and Moroccan Mint (which I drink daily to aid digestion).

    All of Coconut & Cotton’s loose teas are sold in 100% biodegradable packaging so you can pop the kettle on knowing your daily cup of tea is plastic-free and won’t be filling landfills for generations to come!

    To make the following tea infused drinks you will need loose tea which you can shop from Coconut & Cotton using the links below. 

    Mango sorbet green tea at £4.60 100g

    Pure hibiscus tea at £4.20 for 90g

    Shop from Coconut & Cotton’s range of 30 plus loose teas starting from £2.80 per bag.

    Coconut & Cotton often add tea samples to their orders so you’ll be able to try even more when you shop from them

    6 tea infused drink recipes

    Okay, so now that you know why loose tea is better for you and the environment, here’s 6 tea infused drinks for you to cool down with.

    The following recipes make one glass of each tea infused beverage.

    1. Iced tea 

    If you don’t fancy drinking a hot cup of tea on a sweltering summer’s day then my friend, you are not alone. The easiest way to enjoy all the benefits of your favourite tea is to make iced tea! Here’s how to make Iced tea using loose tea:

    What you need to make iced tea


    • 1 tsp of tea from Coconut & Cotton, I’m using their Mango sorbet green tea 


    • 250ml boiling water


    • A handful of ice cubes


    How to make iced tea


    1. Measure out 1 tsp of loose tea into a tea infuser and place in a mug


    2. Pour the boiling water over the infuser and leave the tea to brew for 2-3 minutes


    3. Remove the tea infuser and leave the tea to cool for a moment


    4. Pour the tea over ice in a glass and enjoy through one of Coconut & Cotton’s glass straws


    2. Agua de Jamaica, Hibiscus juice

    PFH Fun Fact: “Flor de Jamaica” is a Central American term for hibiscus flower.

    Agua de Jamaica is a classic agua fresca – a non-alcoholic drink made with water infused by either fruits, seeds, flowers or grains – in Mexico and is made by steeping hibiscus flowers, so it’s basically hibiscus juice but it actually tastes like a tart cranberry juice. It’s both sweet and tart and accompanies a summer lunch or BBQ very well and it’s loaded with vitamin C so it’s great for your immune system. Here’s the recipe for Agua de Jamaica:

    What you need to make Agua de Jamaica (hibiscus juice)


    • 1 tsp Pure hibiscus tea from Coconut & Cotton


    • 50ml boiling water


    • 200ml cold water


    • 2 tsp caster sugar (traditionally Agua de Jamaica is served very sweet but I don’t want to recommend adding too much sugar so add as per your preference)


    • A sprig of fresh mint to garnish


    • Handful of ice cubes


    How to make Agua de Jamaica (hibiscus juice)


    1. Measure out 1 tsp of loose tea into a tea infuser and place in a mug


    2. Pour the boiling water over the infuser and leave the tea to brew for 10 minutes


    3. Remove the tea infuser and stir in the sugar until it dissolves then leave to cool


    4. Pour the tea over ice in a glass, top up with cold water then garnish with a sprig of fresh mint and enjoy through one of Coconut & Cotton’s glass straws


    3. Mango sorbet green tea punch

    Looking for something you can make for a gathering of friends or family? Multiply this rum punch recipe below to please the crowd, it’s perfect for summer BBQs!

    What you need to make mango sorbet green tea punch


    • 1 tsp Mango sorbet green tea from Coconut & Cotton


    • 100ml boiling water


    • 100ml ginger beer


    • 25ml rum


    • 1 slice of lemon


    • Handful of ice cubes


    How to make mango sorbet green tea punch


    1. Measure out 1 tsp of Mango sorbet green tea into a tea infuser and place in a mug


    2. Pour the boiling water over the infuser and leave the tea to brew for 2-3 minutes


    3. Remove the tea infuser and leave the tea to cool


    4. Add the ice and lemon slices to a glass


    5. Pour the tea over the ice, top up with ginger beer, stir and enjoy through one of Coconut & Cotton’s glass straws


    4. Hibiscus tea margarita

    Pink margaritas, need I say more? Mix up your regular margarita recipe and simply add some chilled hibiscus tea, it’s really that simple but looks way more fun!

    What you need to make a hibiscus tea margarita 


    • 1 tsp of Pure hibiscus tea from Coconut & Cotton


    • 125ml of boiling water


    • 50ml Blanco tequila


    • 25ml cointreau


    • 25ml lime juice


    • 1 slice of lime


    • 1 tbsp table salt


    How to make a hibiscus tea margarita


    1. Measure out 1 tsp of Pure hibiscus tea  into a tea infuser and place in a mug


    2. Pour the boiling water over the infuser and leave the tea to brew for 2-3 minutes


    3. Remove the tea infuser and leave the tea to cool


    4. In the meantime sprinkle the salt onto a saucer and cut a decorative slice of lime for garnishing 


    5. Run lime juice from the lime around the rim of the glass and dip it into the salt on the saucer


    6. Add the brewed Pure hibiscus tea, tequila, cointreau and lime juice to a cocktail shaker filled with ice and shake until the shaker feels cold in your hand


    7. Strain the cocktail into the glass over ice and garnish with the slice of lime 


    5. Mango and raspberry green tea mocktail

    For those who don’t drink alcohol but want something a little more exciting than iced tea, give this mango and raspberry green tea mocktail a go. 

    What you need to make a mango and raspberry green tea mocktail


    • 1 tsp Mango sorbet green tea from Coconut & Cotton


    • 125ml boiling water


    • 100ml lemonade


    • 3-5 raspberries


    • A sprig of fresh mint


    • Handful of ice cubes


    How to make a mango and raspberry green tea mocktail


    1. Measure out 1 tsp of Mango sorbet green tea into a tea infuser and place in a mug


    2. Pour the boiling water over the infuser and leave the tea to brew for 2-3 minutes


    3. Remove the tea infuser and leave the tea to cool


    4. Add the ice, raspberries and a few mint leaves to a glass


    5. Pour the tea over the ice, top up with soda water and garnish with a sprig of mint and stir and enjoy through one of Coconut & Cotton’s glass straws


    6. Hibiscus champagne cocktail

    Add a little something, something extra to your champers or prosecco, you do you boo, by infusing your glass with some hibiscus petals. It doesn’t take many to turn your plain bubbles into hot pink fizz with this very simple recipe.

    What you need to make a hibiscus champagne cocktail


    • A pinch of Pure hibiscus tea from Coconut & Cotton


    • 250ml of champagne or prosecco – whatever your preference


    How to make a hibiscus champagne cocktail


    1. Pop a pinch of Pure hibiscus tea that includes a few flowers to a champagne flute or coupe glass


    2. Fill your glass with either your choice or champagne or prosecco, leave the hibiscus tea to infuse for a couple of minutes then give it a stir before serving


    Coconut & Cotton products used to make these tea infused beverages

    The following products used to make the tea infused recipes listed above can all be purchased from Coconut & Cotton – a female owned, UK based and plastic-free company – by clicking on the links of each product. 

    For more content featuring Coconut & Cotton check out Eco-conscious period packing list, How to make handmade loofah soap, How to have an earth-conscious spa day at home and Sustainable stocking fillers for travellers.

    If you try any of the tea infused recipes above then let me know how it worked out in the comments below or share with other readers what your favourite way to enjoy your tea is.

    Do more on & for the planet, 

    Gabriella

    Pin this post


    This is a sponsored post with one of PFH’s longterm brand partners, Coconut & Cotton

  • Homemade raspberry jam recipe

    Homemade raspberry jam recipe

    As you are aware, this homemade jam recipe blog post has been published in the midst of a worldwide pandemic. I haven’t left England in over a year and I don’t have any trips booked for the foreseeable future. Giving you fresh travel content is tricky, but I want to keep giving you blog posts that can at least keep you occupied whilst you also wait for your borders to open, so here I am publishing my Mum’s jam recipe. 

    Her homemade jam is stashed in just about every corner of her kitchen so we can all trust that she makes a good jam. You didn’t come here to read an essay about why you’re getting a homemade jam recipe though as the chances are you’re here because you just want a jam recipe, right? If that’s the case scroll down for the recipe. Everything that comes between now and the recipe is me answering some frequently asked jam related questions, so if you find yourself thinking “how long will this jam last Gaby?” check back here and I won’t judge you for skipping these paragraphs before the recipe – we all do it!

    Notes on making homemade jam

    Homemade jam is really easy to make, plus it’s a really cute gift if you’re trying to give more eco-conscious presents – it uses minimal ingredients, it preserves the fruit for much longer and it gives a greater purpose to your upcycled jars.

    PFH Top Tip: Wear an apron or something dark coloured that you’re not precious about as the jam will spit.

    Can I take jam on a plane?

    Making jam out of fresh fruit is also a really neat and easy way to preserve fruit to bring it home from your travels in your suitcase, should you be staying in accommodation with a kitchen. 

    Border restrictions prevent you from being able to enter a country with fresh fruit but the sugar in jam preserves the fruit and eliminate the risk of pests and diseases that can spread with fresh fruit.

    Of course, the jam is a liquid so you will have to pack it into your checked luggage to be able to bring it back. Make sure it’s protected within your luggage so it doesn’t break when your suitcase gets tossed around behind the scenes.

    Jars are super easy to get hold of in homeware stores so should you go coconuts for some juicy mangoes on your tropical travels, you can make them into jam and bring them home to enjoy! I actually made a raspberry and mango jam with this recipe (if you add another fruit then increase the amount of sugar to match the weight of all the fruit) and it was delicious!

    How do I sterilise up-cycled jars?

    It’s super simple to sterilise old jars to give them a second life such as holding your homemade jam. Place the jar into a container filled with warm soapy water and leave for a few hours to remove the labels and the sticky residue. Then either wash out the jar or put it in the dishwasher to clean the inside.

    To sterilise it before using it for food storage (leftovers, jam etc.), pour some boiling water into it  and let it sit for a few minutes. Wear oven gloves/mitts or use a tea towel to touch it to pour out the water so you don’t burn your hands. Dry it and it’s ready to use.

    You may also be interested in my Mauritian achard légumes recipe, a vegetable pickle you can store in your sterilised jars!

    How much jam will this recipe make?

    This is a small batch jam recipe and will make one jar of jam. A 150g punnet of raspberries (which is a standard measurement in British supermarkets) will make one 350g jar of jam.

    Although I give quantities of the ingredients below the rule of thumb for jam making is to have equal sugar to fruit. The quantities in my jam recipe are based on the punnet of raspberries I bought, so just check the weight of the punnet you buy and adjust your sugar to equal it. 

    Take into consideration this is based on weight not volume.

    How long will homemade jam keep?

    If you store homemade jam in a cool and dry space that is out of direct sunlight it will last for 12 months. 

    Once opened, your jar of jam should be consumed within a couple of months. 

    Store opened jars of jam in the fridge.

    Use a clean spoon/knife (as opposed to one with butter on it) to prevent it from getting contaminated.

    How will I know my jam is the right consistency?

    I explain the process for checking your jam is the right consistency in step 9 of the recipe below but if you’re just looking for this answer then the test goes as follows:

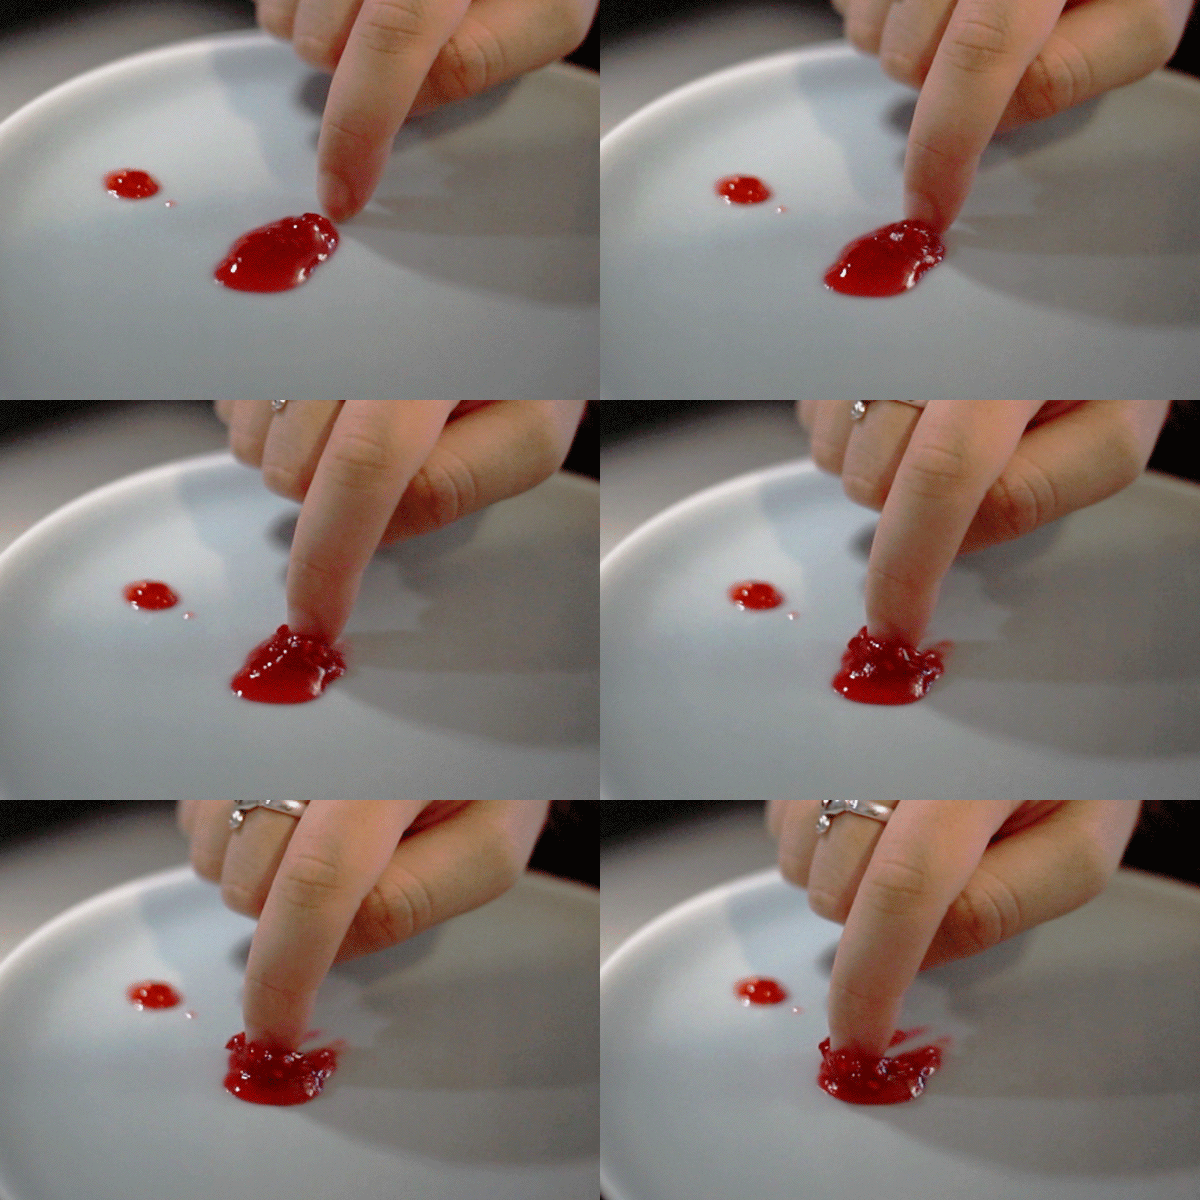
    To test if your jam is ready to pour into your jar push your finger through the centre of the jam. If the jam ripples in resistance to your finger nail and your finger leaves a clear path through the jam then your jam is at the right consistency.

    If you’re still unclear then take a look at step 9 for a GIF that perfectly illustrates what I mean.

    What you need to make jam

    Wooden spoon

    Medium saucepan

    Small saucepan

    Scales/measurement cups

    Tbsp measure

    Small plate

    Jam jar with lid

    Homemade raspberry jam ingredients 

    150g / 1 ⅓ cups / 5.3 oz of fresh raspberries

    150g / ¾ cups / 5.3 oz of Billington’s golden caster sugar

    1 tbsp lemon juice

    Raspberry jam recipe

    1. Put a small plate in the fridge. This is for checking if your jam is the right consistency before pouring into your jar to set.

    2. Pour some boiled water into your jar to sterilise it. Set it aside until you’re ready to pour the jam in.

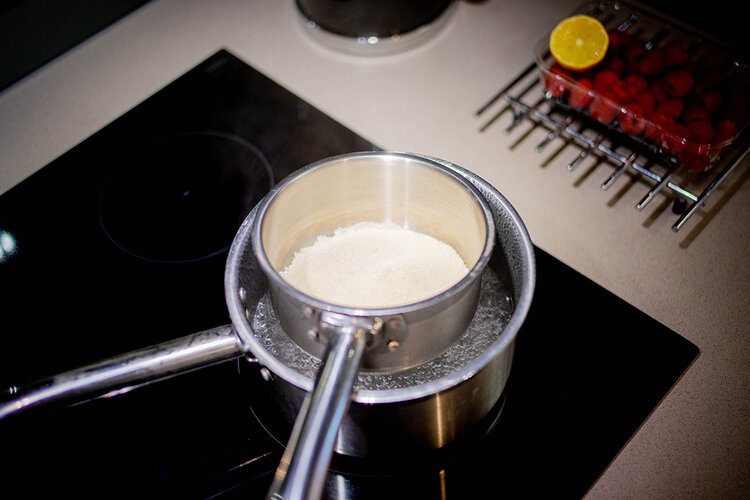
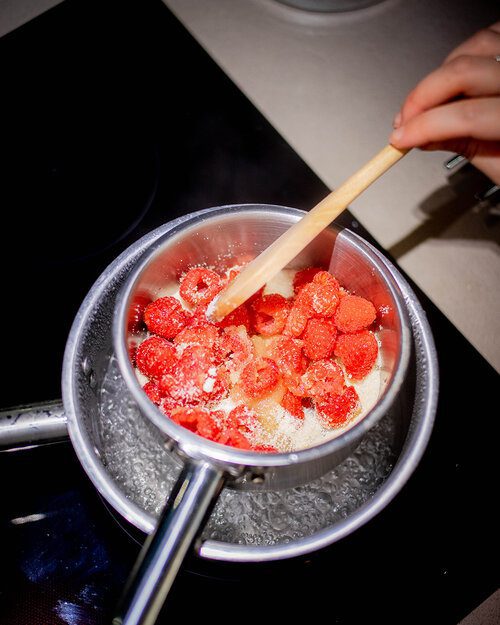
    3. Set up a double boiler by placing the smaller saucepan into the larger saucepan and bringing enough water to the boil in the large saucepan that it heats the small one but doesn’t touch the bottom. Once the water is boiling, turn it down to a simmer.

    4. Add your sugar to the small saucepan and leave it to gently warm the sugar, this will encourage the fruit to melt rather than burn when you add it. Stir the sugar every few minutes to make sure it’s heating evenly.

    5. Once the sugar is warm to the touch (it should only take about 8 minutes) add your raspberries (or fruit of choice) and lemon juice.

    6. Gently stir to encourage the fruit and sugar to melt together.

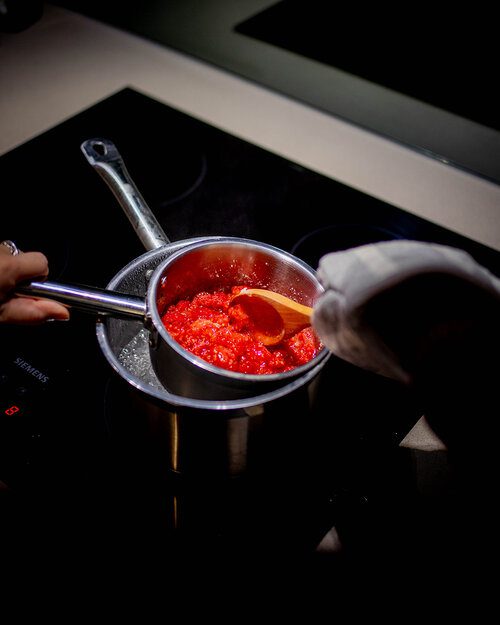
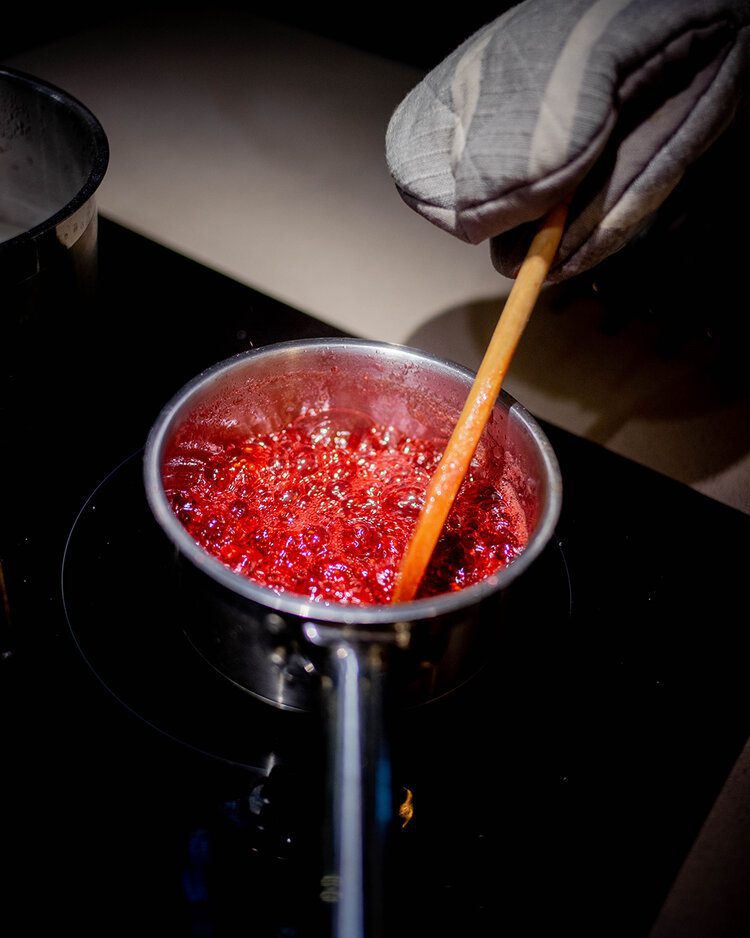
    7. Once the fruit and sugar has combined, remove the small saucepan from the large one and place it directly onto the hob (giving the bottom a quick wipe dry before) and increase the heat until you have brought the mixture to a boil, stirring it consistently every 5 seconds. WARNING, the jam mixture will spit as it boils so wear oven gloves/mitts to protect you hands.

    8. After 10 or so minutes boiling, the consistency should go from runny to sticky. If it is still runny then continue to boil and stir it. You want to keep an eye out for when it starts to stick to the sides of the saucepan.

    9. Once you see the jam starting to stick, take your small plate from the fridge and use the spoon to drop a small amount of jam onto it. To test if your jam is ready to set, push your finger through the centre of the jam, just like I’m demonstrating in the GIF below. If the jam ripples in resistance to your fingernail and your finger leaves a clear path through the jam then your jam is at the right consistency. If it doesn’t ripple and looks as though your finger was never there then continue to boil and stir the jam until it appears thick enough to try this test again.

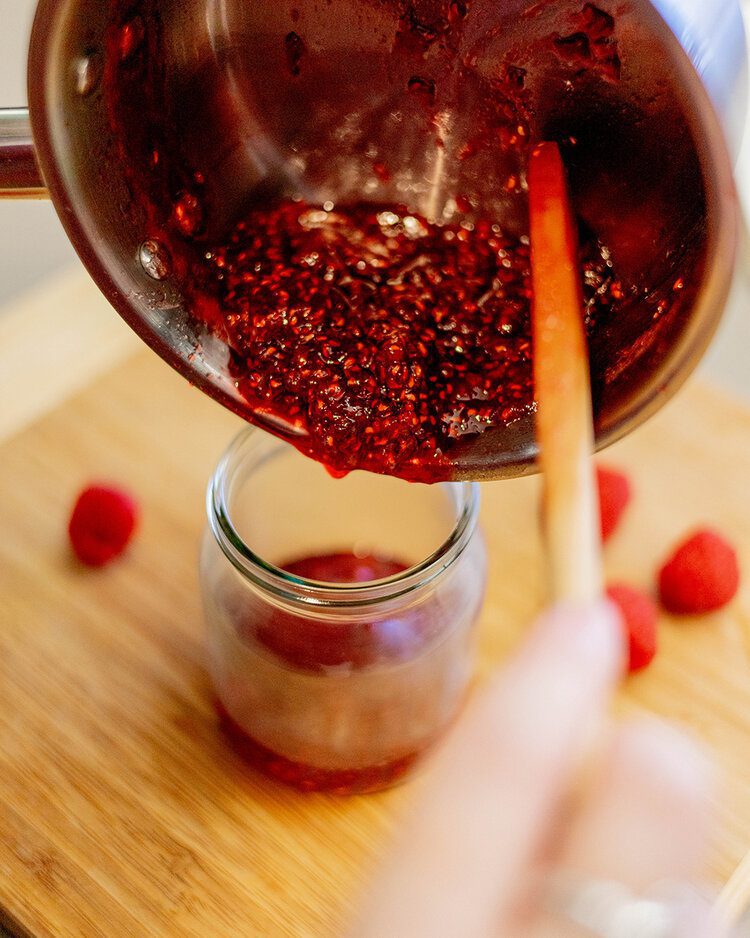
    10. Once your jam is the right consistency on the plate, take the saucepan off the heat. Pour the water out of the jar, dry it and pour the jam in. Place the lid on whilst the jar is still warm so that it forms a seal (as it cools you’ll hear a pop as the lid expands to form a seal).

    11. Leave it out to cool completely so that it sets. You can keep your unopened jam in a cool and dry place for up to a year. Once opened, store it in the fridge where it will last for a couple of months.

    Bon appétit!

    You may also be interest in my vegan sugar cookies recipe.

    Do more on and for the planet, Gabriella

    Pin this post


  • Simple vegan sugar cookies recipe

    Simple vegan sugar cookies recipe

    This sugar cookie recipe is super simple, needs very few ingredients but makes delicious and really cute biscuits that can be enjoyed on any occasion. As you’ll see from the photos I love making them for Valentine’s Day but I also make them as Christmas cookies or whenever there’s a party – ahh remember what parties were? Those were the days.

    I’ll be honest with you, being a travel blogger in a time when international travel is illegal is getting to be somewhat tricky and makes me feel like some kind of dirty accomplice. Sharing fresh travel content not only during the UK’s 3rd lockdown but also having not left the country for over a year now isn’t easy but of course I want to provide you with useful content that can at least keep you occupied in your spare time whilst you’re not working from home and you can’t travel.

    So with that said, here’s my sugar cookie recipe for the cookies that I will most likely bring to your party when they’re legal again but until then, you can bake these little bickies (that’s Brit slang for biscuits which are cookies, yes I know you’re now practicing your English accent) yourself for your zoom party or whatever sad thing we’re all doing to feel alive on a weekend during the pandemic.

    What if I don’t want vegan sugar cookies?

    I’ve been reducing my dairy intake for the last 3 years but I’ve been baking these sugar cookies for so much longer. Originally I was baking them with an egg and butter before switching to margarine and vegan eggs.

    Sure, they’re richer with butter but they are delicious baked with dairy or vegan ingredients so I would urge you to try the vegan option for the future of the planet but either way, they will taste amazing!

    How to make gluten free sugar cookies

    Simply switch out the plain flour for gluten free plain flour and use double the amount of egg or vegan egg replacement if you want to make these easy sugar cookies gluten free. I will say that despite the vegan eggs and butter making no difference to the taste or texture, the gluten free flour does make the sugar cookies dryer. I always counteract this by using piping icing so you don’t notice it quite so much. They will look at lot more pale than if they weren’t gluten free so don’t bake them for longer than 10mins.

    How long sugar cookies will last

    Sugar cookies will last 2 weeks if stored in a dry, airtight container for 6 weeks in the freezer.

    If you have an event coming up such as Valentine’s Day or Christmas and you’re short on time, you can use this recipe to make them in advance and then freeze the sugar cookies. Just take them out of the freezer to defrost for at least 2 hours to be sure they’re ready to eat.

    How to decorate sugar cookies

    If I have a lot of time I will mix up icing sugar with water and food colouring and smooth the icing over each one, but it’s very time consuming and usually something I do for Christmas. If you choose to do this you will need to leave them to set overnight.

    If you want to add sprinkles then add them before you leave the icing sugar mixture to set.

    When I’m short on time, I use the same cookie cutter to cut out fondant icing which I’ll stick on with a little icing I’ve made with water and icing sugar. 

    Add a little something extra by decorating them with piping icing. My tip for using piped icing is to go slower than you would think necessary to keep your pattern or writing consistent.

    This recipe will make approximately 36 sugar cookies.

    Ingredients

    Sugar cookies

    275g / 2¼ cups plain flour

    100g / ½ cup caster sugar

    100g / ¼ cup and 3 tbsp vegan margarine or butter

    1 free range egg / 3 tbsp vegan egg replacement for baking, check the packaging for the brand you use (I used Oggs) 

    1 tsp vanilla extract

    Icing 

    Piping icing with:

    400g icing sugar mixed with 3-4 tbsp water with ½ tsp of food colouring

    Or 

    250g fondant icing

    Equipment 

    Mixing bowl

    Scales or measuring cups

    Measuring spoons

    Wooden spoon

    Rolling pin

    Cookie cutter in shapes of your choice

    Cooling wire/rack

    Method

    1. Preheat the oven to 190ºC Fan or 374ºF.

    2. Line your baking trays/sheets with greaseproof/parchment paper (if you have a reusable lining then use that).

    3. Cream the butter and sugar together in the mixing bowl with a wooden spoon.

    4. Beat in the egg or vegan egg replacement and vanilla extract.

    5. Stir in the flour and bring it together until the mixture forms a dough (you will need to use you hands towards the end).

    6. Split the dough into two so you can manage it better and roll it out onto a lightly floured surface until it’s 1cm thick.

    7. Take your cookie cutter in the shape(s) of your choice and cut out your cookies/biscuits. Keep rolling out the excess dough until you have cut as many cookies as possible, you will get approximately 18 from each half of the dough. Place your cookies onto your pre-lined baking trays/sheets.

    You may also be interested in my American Buttermilk Pancakes recipe.

    8. Bake your cookies in the oven for 8 – 10mins, you want to catch them right before they start to brown on the edges, they should be baked but pale in colour. Start them at 8mins and if they’re about to turn golden then remove them, if they’re looking under-baked then leave them in a further 2mins but no longer.

    9. Place your baked sugar cookies on a cooling wire/rack and leave them until they’re cool to the touch. You want to decorate the sugar cookies when they have cooled down completely or the icing will melt.

    You may also be interested in my traditional British Christmas mince pies recipe.

    Bon appétit, Gabriella

    Pin this post


  • British Christmas mince pies recipe (no suet)

    British Christmas mince pies recipe (no suet)

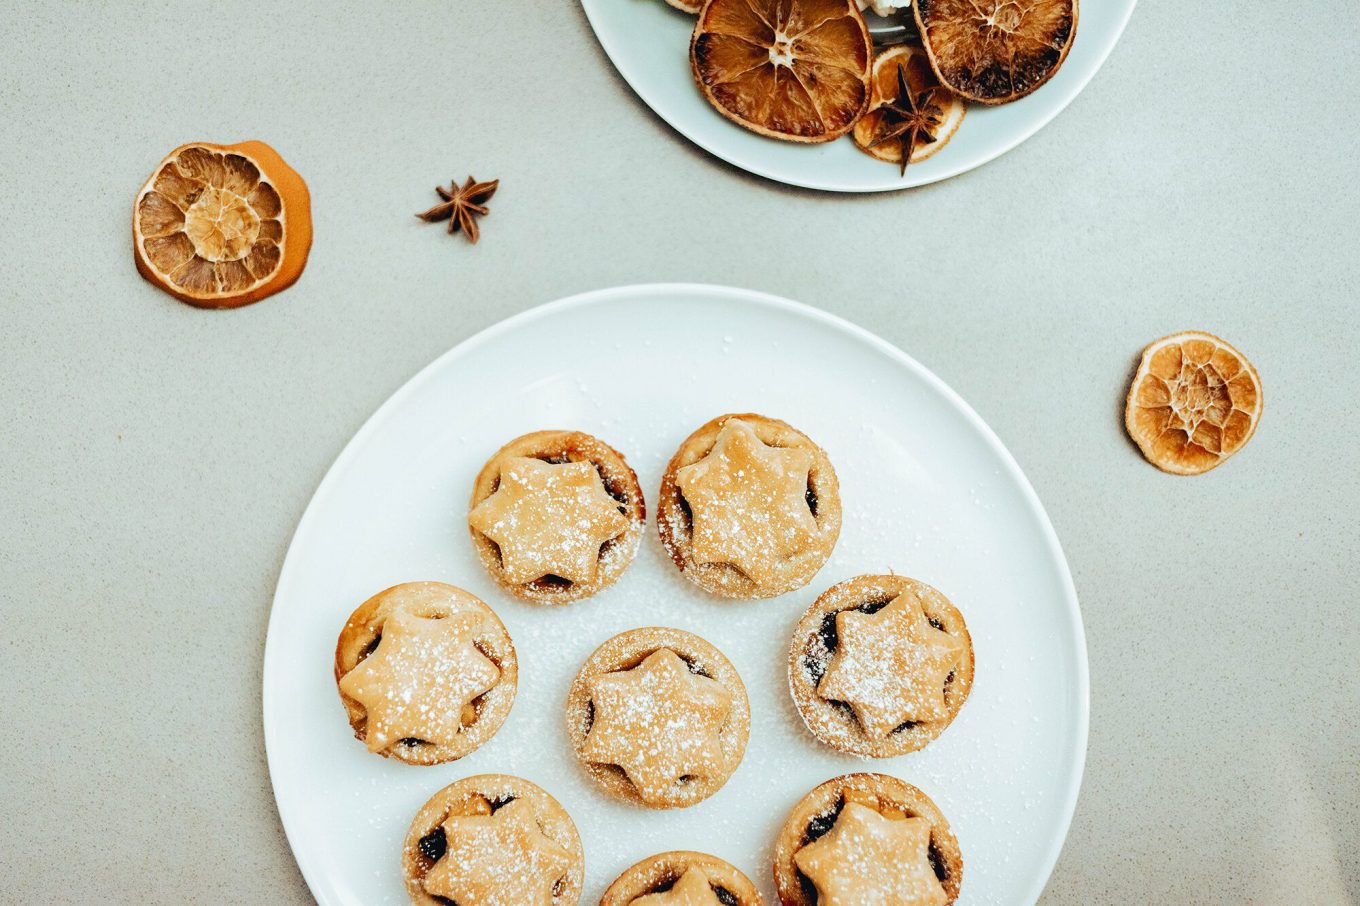
    Mince pies are small, sweet pies traditionally served at Christmas as an afternoon treat with a cup of tea or coffee. There are various versions of mince pies available to shop, from sweet to savoury pastries, sober to boozy mincemeat fillings and with all sorts of additions such as nuts and cranberries but this recipe makes a festively spiced mincemeat with a simple savoury shortcrust pastry. If you’re unfamiliar with mincemeat (not mince meat) then rest assured that it is not made from meat, it is a combination of dried fruits and peel mixed together with sugar and spices such as nutmeg, cinnamon and cloves.

    Fun facts about mince pies


    • The concept of spiced fruit came to England from the middle east in the 13th century


    • They’re traditionally religious and represent the birth of Jesus, the key spices – nutmeg, cinnamon and cloves – symbolise the gifts given by the three wise men


    • Originally they were rectangular to represent Jesus’ cradle


    This mince pie recipe will show you how to make both the mince pie filling and the pastry. This is important because to save money and time most Brits (who aren’t just buying pre-made mince pies) will buy a jar of ready-made mincemeat, but I have been informed that mincemeat isn’t available in North American supermarkets as well as various other places around the world. So, I’m helping you to make this British classic from scratch, don’t worry it’s super easy and requires little to no baking skills!

    So one thing I should note about this recipe is there’s one ingredient that is found in all pre-made jars of mincemeat on British supermarket shelves but isn’t in mine: suet. The reason I chose not to put suet in is because traditional meat suet isn’t vegan or vegetarian (if you didn’t know, it’s made from animal fat) and though there is vegetarian suet, that contains gluten. I’ve put together a recipe that can be made gluten free, dairy free, vegan and vegetarian and suet just didn’t make the cut. So instead I’ve used butter because it’s gluten free and can be swapped out to dairy free margarine without hesitation. 

    Swaps to make this allergy friendly are:

    Gluten free 


    • Gluten free self raising flour


    Dairy free 


    • Margarine


    Vegan 


    • Margarine


    • Dairy free milk to glaze instead of egg


    Vegetarian


    • This recipe is vegetarian, it doesn’t use meat!


    Despite having a chef and a professional cook in the family who have helped me out with many of the recipes here on PFH, when it came to mince pies I turned to Michael’s Nanny (that’s grandma for any confused North American readers) who hands down makes the family’s favourite mince pies. I don’t even like mince pies unless they’re hers. She has the contrast between spiced, sweet and savoury down and though I believe what really makes hers the best is that they’re baked with love (or maybe it’s more to do with the fact that she gets me piddled on her home made sloe gin every year), I’ve done my best to bring her pastry recipe to you, so you too can have a little British magic at home this festive holiday season.

    When planning to make these, take note that you’ll want to leave at least 24 hours between making the mincemeat filling and baking the pies. The mincemeat mixture needs at least 24 hours for the flavours to infuse and intensify, giving your pies that beloved festively spiced flavour.

    Right then, if you bothered to read any of that it’s finally time to get to the recipe! 

    Makes 24

    Equipment


    • 12 case muffin tin (x2 if baking all 24)


    • Measuring cups/scales


    • Spoon measurements


    • Mixing bowl


    • Wooden spoon


    • X2 jars with lids


    • Grater


    • Large wax wrap


    • Rolling pin


    • Round cookie cutter (size depends on the size of your muffin tin)


    • Star cookie cutter (for the lids)


    • Fork


    • Pastry brush


    Filling ingredients


    • 375g / 2½ cups, 13½ oz of mixed fruit and peel


    • 125g, ½ cup, 4½ oz soft brown sugar


    • 1tbs vanilla extract


    • 1tsp ground mixed spice


    • ½ tsp cinnamon


    • 150g, ⅔ cups, 5 ½ oz grated butter


    • 1 medium orange – juice and zest


    • 1 lemon – juice and zest


    • 1 Bramley apple – peeled, cored and grated


    If you want these to be a little boozy then add 1 tbsp of brandy when you add the vanilla

    Pastry Ingredients 


    • 250g, 2 cups, 16oz Self Raising flour


    • 114g, ½ cup, 4oz butter (just do 8oz margarine if you’re going vegan or dairy free)


    • 114g, ½ cup, 4oz margarine (extra for greasing)


    • 16 – 20 tsp water


    • 1 Egg or 2 tbsps of dairy free milk


    • Icing sugar (for decorating or hiding mistakes)


    Method 

    Mincemeat filling

    1. Measure out the butter and grate it (if you’re using a dairy free butter you can skip grating it, it just makes the harder butter easier to work with) then add to the mixing bowl.

    2. Measure out the mixed fruit and peel, sugar, vanilla, mixed spice and cinnamon and add to the butter.

    3. Peel, core and chop the apple and add to the mix.

    4. Zest and juice the lemon and orange and add it all to the mix.

    5. Combine all the mince pie filling ingredients by giving them a good stir with a wooden spoon.

    6. Spoon the filling into a couple of jars and leave in the fridge for at least 24 hours to let the flavours fully infuse. I recommend leaving it in the jars for at least 2 days. It will last for about a week.

    Pastry

    Preheat the oven to 180°C/356°F.

    1. Grease the muffin tin with margarine.

    2. Measure out the flour and add it to a mixing bowl.

    3. Measure out the margarine and add it to the bowl.

    4. If you’re using butter, measure it out and cut it into cubes so it’s easier to manage.

    5. Rub the butter and/or margarine into the flour with your fingers to resemble breadcrumbs.

    6. Sprinkle flour on your hands to stop the mixture from sticking to your hands in this next part. Add water by the teaspoon and bring the mixture together with your hands to form a dough. Keep adding teaspoons of water until its formed until a ball that’s not too dry and not too sticky.

    7. Knead the dough a little because I’m telling you to. Honestly I don’t understand kneading but it made it easier to roll out than when I didn’t (I’m a travel blogger not a GBBO contestant, okay).

    8. Cover the dough in the mixing bowl with a wax wrap and place in the fridge for 15mins to make the dough easier to manage.

    9. Sprinkle your surface and rolling pin lightly with flour before thinly rolling out your dough (you can split the dough in half to make it easier to roll out).

    10. Cut out 24 pie bases with a round cookie cutter and transfer the disk to your muffin tins, gently pressing them in for a snug fit.

    11. Fill each pie with a tablespoon of your mincemeat filling, avoid adding too much of the syrup that will have formed in your mincemeat as it will spill out when baking and make it really hard to get the pies out of the tin.

    12. Crack an egg and beat it with a fork or pour 2 tbsps of dairy free milk into a cup and use whichever one to glaze the rim of the pies.

    13. Return to your pastry, bring it together again and roll it out.

    14. Cut out 24 lids with the star cutter and place one on top of each pie, gently pressing down on the edges so they seal to the pie base.

    15. Wash over each lid with either the leftover egg or milk.

    16. Place the trays in the oven and bake for 15-20 mins, until the pastry is golden brown.

    17. Remove from the oven and set aside to cool for 5mins before gently removing each pie from the tin.

    18. Before serving dust the mince pies with icing sugar. You can do this by placing some icing sugar in a sieve then holding it over the pies and tapping.

    If you aren’t eating all 24 right away (I mean at a party, although Michael could probably manage one tray to himself) then you can store them in a tin or air-tight tub and if you want them for a later date then once they’ve completely cooled down, pop them in a sealed container in the freezer.

    Bon appétit!

    If you want to try any other classic British sweet treats check out my other blog post, Great British desserts every traveller must try and if you haven’t already, why not give my banana bread recipe a go! 

    For other festive content take a look at:

    Mele Kalikimaka, Gabriella

    Pin this post


  • 5 no-cook recipes you can make in a hotel room

    5 no-cook recipes you can make in a hotel room

    Need hotel room food ideas? These five no-cook meals for travelling are perfect for making in your hotel room when you don’t have a kitchenette or are looking to save money on your travels. These easy no cook recipes are a mix of vegan, vegetarian, meat, dairy free and gluten free meals that are all healthy and delicious – there’s something here for everyone. These travel food recipes are perfect for when you have a tight travel budget and want to save money by not eating out but don’t want to eat junk food and don’t have a kitchen to cook in. These no-cook recipes are also ideal for camping if you don’t have a stove to cook on but want to make something healthy to eat.

    Eating out in new restaurants is one of the most exciting things about travelling but do you ever feel like you can’t be bothered to go out, want to save money or need to resist temptation of another bowl of pasta? Well you’re not alone! Often I will opt to save money by making no-cook meals in my hotel room and these are my top recipes that don’t require any cooking.

    I’ve been experimenting the past few summers whilst road tripping to be able to eat well with very little kitchenware and have made these five no-cook meals for travelling as simple as possible because I know first hand that we aren’t equipped with the regular basics such as seasonings or a microwave in hotel rooms. I’ve also picked five no-cook recipes that have ingredients that cross over to help you use up what you’re buying and to make them cost-efficient.

    What you need to make food in a hotel room

    To make these five no-cook travel food recipes for road trips, hotel stays or camping you will only need the following three items:


    1. Swiss Army knife – this will be your knife, can opener and scissors


    2. Camping cutlery – to stir, serve and eat with (I have metal ones but bamboo cutlery are a good low-waste choice)


    3. Collapsible bowl – your chopping board and bowl


    I previously wrote 6 items for making food in your hotel room which features a few more bits that are super helpful for making food to pack-up for the day.

    You may also be interested in my guide to picking the best reusable coffee cup.

    Tips for making food in a hotel room


    • Pay attention to tins having ring pulls to make life easier for you, but don’t worry if you can’t get one as your Swiss Army knife should have one


    • Try to buy loose fruit and vegetables so you can avoid extra plastic packaging but it also means you don’t need to buy in bulk when you won’t be able to eat it all


    • Buy a large onion and spread it out across all the recipes that use it


    • Use your collapsed bowl as a chopping board as the base is solid


    • Use cherry tomatoes because they only require a small surface space for cutting


    • I have cleaned my counter before taking these photos but I do recommend you avoiding placing your food on the surface space of your hotel room. Use your bowl or the food packaging 


    1. Vegetarian wraps

    Swap the vegan ham to ham to include meat and use gluten wraps if you don’t need a gluten free meal.

    Ingredients


    • Ham


    • Cucumber


    • Sweetcorn


    • Cress (easy to use up vs. a bag of salad)


    • Hummus


    • Wraps (these gluten free fajita wraps are so much better than any other gluten-free wrap I have ever tried so I always get these)


    No-cook vegetarian wrap recipe


    1. Spread a layer of hummus over your wrap


    2. Lay a few slices of ham on top


    3. Sprinkle on some sweetcorn


    4. Use your Swiss Army knife and bowl to chop up the cucumber into small chunks and sprinkle over your wrap


    5. Top with cress, roll up and enjoy


    2. Tuna and avocado dip recipe with crackers

    Swap out the tuna for feta to be vegetarian or to tomatoes to be vegan. You could also use a vegan tuna substitute such as Tuno.

    Ingredients


    • X1 tin of tuna


    • Onion


    • Avocado


    • Cucumber


    • Lime (stops the avocado from tuning brown and adds flavour)


    • Crackers (oat cakes for a gluten free version)


    No-cook tuna and avocado dip recipe


    1. Use your Swiss Army knife and bowl to chop up the cucumber into small pieces and leave it in the bowl


    2. Do the same with some onion


    3. Cut your lime in half and put it to the side for a moment


    4. Cut open your avocado and scoop it into the bowl


    5. Squeeze your lime over the avocado and add the remains to your water bottle to infuse your water and give it a second life


    6. Open and drain your tuna and add it to the bowl


    7. Stir and serve on crackers


    3. Mixed bean salad recipe

    Swap out cheese to hummus to be vegan, add ham to include meat or use vegan ham to be vegetarian and vegan.

    Ingredients


    • X1 can of mixed beans


    • Cherry tomatoes


    • Onion


    • Sweetcorn


    • Cucumber


    • Feta cheese


    No-cook Mixed bean salad recipe


    1. Use your Swiss Army knife and bowl to chop up the cucumber into small pieces and leave it in the bowl


    2. Do the same with some onion and cherry tomatoes


    3. Sprinkle in some sweetcorn


    4. Drain your can of beans and add them to your bowl


    5. Crumble over some feta cheese and enjoy


    4. Roast Chicken salad

    Ingredients


    • Pre-cooked chicken from the hot deli counter at the supermarket


    • Sweetcorn


    • Cherry tomatoes


    • Cucumber


    No-cook roast chicken salad recipe


    1. Use your Swiss Army knife and bowl to chop up the cucumber into small pieces and leave it in the bowl


    2. Do the same with some cherry tomatoes


    3. Add sweetcorn to your bowl along with your pieces of chicken


    5. Antipasto

    Swap out meat to be vegetarian, cheese to vegan cheese and crackers to oat cakes to be gluten free.

    Ingredients


    • Crackers


    • Hummus


    • Sliced meat


    • Cheese


    • Olives


    • Grapes


    • Cherry tomatoes


    • Nuts/crisps


    No-cook antipasto recipe


    1. The great thing about a makeshift antipasto is it requires little effort as you can leave all the elements in the packaging.


    .

    There you have it, five no-cook recipes that are cost-effective, nutritious, easy to make and delicious. These travel food recipes are easy meals to make in your hotel room and will save you so much money.

    Let me know in the comments below if you liked or have tried these hotel room dinner ideas and if you want me to share more!

    Bon appétit, Gabriella

    Pin this post featuring 5 no-cook hotel room meals


  • Great British desserts every traveller must try

    Great British desserts every traveller must try

    If there’s one thing British cuisine does well it’s dessert, or as we call it, pudding! With so many classics it was hard to get it down to a digestible number so here’s 11 of the greatest British desserts that I think travellers to the UK need to try, (at least one anyway!)

    All of these desserts can be ordered in pubs across Great Britain (they might not have all of them but it would be peculiar if they didn’t have at least one) and if you want to save money you can also buy them in pretty much any large supermarket across the nation. I’ve also linked out to recipes if you fancy making them yourself at home whilst the pandemic is preventing international travel.

    Traditionally, all the puddings/desserts below are made with wheat and dairy, but with so many more alternatives available these days, it’s easy to make or find gluten free, dairy free or vegan versions of these Great British delights.

    I started working on this blog post in March right before the UK went into lockdown so I didn’t manage to get photos for all of the following sweet treats, so Michael very kindly provided some illustrations so you can get an idea of what they look like. Aww ain’t he cute!

    1. Sticky Toffee pudding

    What is it?

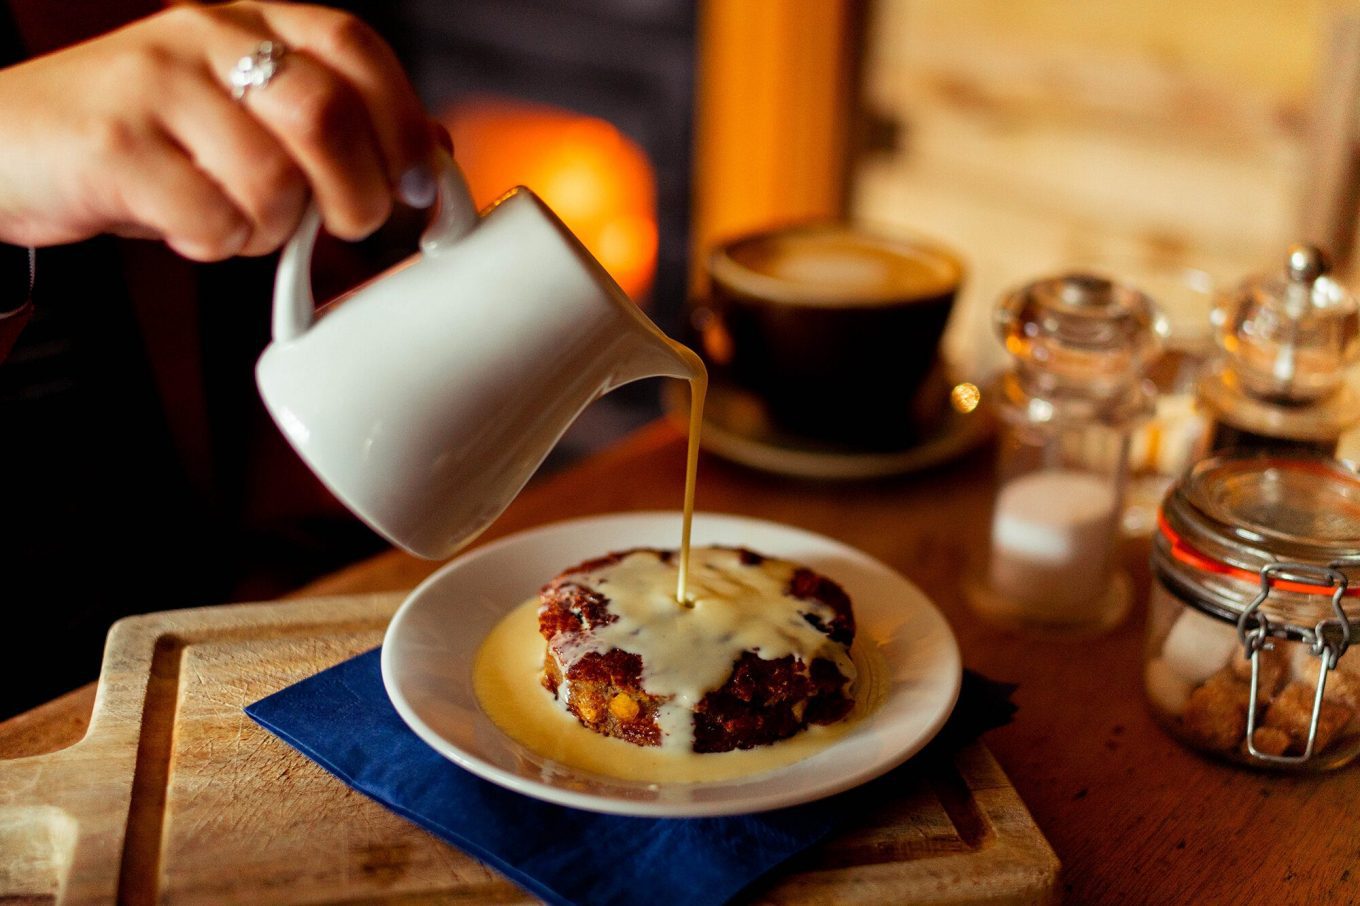
    Sticky toffee pudding, often known as STP, is a dark, moist sponge that is coated to the point that it’s virtually swimming in a rich toffee sauce. Sometimes the sponge is light and fluffy and others make it dense but it’s always extra sweet and sticky.

    Origin story

    The origin of sticky toffee pudding is still highly debated between three possibilities:


    1. STP was first made by Francis Coulson at Sharrow Bay in the Lake District in Cumbria, England in the 70s. Coulson’s recipe is so sought after that all the staff at Sharrow Bay have had to sign a non-disclosure agreement. The recipe itself is kept in a vault within the hotel.


    2. STP was first made in Aberdeenshire in Scotland.


    3. Francis Coulson received the recipe from Mrs Martin of The Old Rectory in Claughton, Lancashire in England.


    Whatever the origin is, it came from a desire to create something warm and comforting for dark and cold winter nights.

    Served with

    Served hot with either custard, cream or vanilla ice cream.

    Recipe

    Get Mary Berry’s classic recipe here.

    2. Spotted Dick

    What is it?

    It’s a polkadot patterned male genital usually served with custard but sometimes cream… UGH could you imagine? Nope, despite the comical name, spotted dick is a steamed suet pudding packed full of currants or raisins. The pudding itself isn’t very sweet but it gets its sweet taste from the dried fruit and custard that it should always be accompanied by.

    Origin story

    Spotted dick originated in the Victorian Era, a period known for its pudding inventions. Its first published mention was in 1850 by chef Alexis Soyer in The Modern Housewife, or, Ménagère. 

    So why spotted dick? “Spotted” comes from the dried fruit scattered throughout the pudding and “dick” is a dialectal name for a plain pudding shorted from “puddick”. Alternative names for spotted dick are Spotted Dog or Railway Cake; “dog” was also another name for a plain pudding abbreviated from “puddog”.

    Served with

    Served hot with warm custard.

    Recipe

    Get James Martin’s spotted dick and custard recipe here.

    For Nadiya Hussain’s Irish soda bread spotted dick recipe, click here.

    3. Bread and Butter pudding

    What is it?

    Bread and butter pudding is made from layered slices of buttered, stale bread that have been sprinkled with currants and cooked in nutmeg seasoned egg and cream mixture. It should be golden and crunchy on top and soft and moist on the bottom. It’s incredibly fragrant for a fairly simple pudding and is ideal for using up stale bread that’s on its way out. Bread and butter pudding is made with stale bread in the same way that banana bread is made with over-ripened bananas.

    Origin story

    The earliest publication of a bread and butter recipe was in Eliza Smith’s The Compleat Housewife in 1728 (take the fact that most of these desserts come from some kind of how-to-be-a-good-housewife guide, with a pinch of salt, Lord knows I am). 

    Before it became bread and butter pudding though, it was known as “whitepot”. Whitepot used bone marrow in place of butter, yeah…. I’m glad it changed too.

    The much loved dessert comes from the necessity to use up stale bread so that it doesn’t go to waste. 

    Served with

    Served hot with either custard, cream or ice cream.

    Recipe

    For Delia Smith’s classic bread and butter pudding recipe, click here. 

    For Jamie Oliver’s bread and butter panettone pudding tart recipe, click here. I made this a couple of Christmases ago and it’s an amazing use for panettone bread, if you’re someone that always gets given one over the festive period. 

    4. Summer pudding

    What is it?

    Summer pudding, otherwise known as summer fruits pudding, is a chilled bread pudding that has been soaked in the fruit juices of seasonal summer berries and has a centre packed full of all of those juicy berries. The berries used may include any of the following:


    • Raspberries


    • Strawberries


    • Blackcurrants


    • Whitecurrants


    • Redcurrants


    • Blackberries


    • Tayberries


    • Loganberries


    • Cherries 


    • Blueberries


    • Gooseberries


    Origin story

    Another Victorian pudding made from stale bread, yes, but this one is entirely different from bread and butter pudding as it swaps out a rich dairy mixture for being soaked in fresh summer berries. Oh, and it’s served chilled.

    A similar recipe to summer pudding dates back to 1904 but was served hot. The most similar recipe came much earlier in the late 1800’s but it was called “Hydropathic pudding”, served to ladies in spas as it was seen to be a healthier option to stodgier suet puddings.

    Served with

    Serve chilled with thick pouring cream.

    Recipe

    The very best summer fruit pudding recipe has to come from Delia Smith, click here for her recipe.

    5. Crumble 

    What is it?

    Crumble is to the Brits what pie is to North Americans; it can be made with multiple fruit fillings and is often enjoyed after a large family meal.

    It’s a base of stewed fruit topped with mixture resembling breadcrumbs made from flour, butter and sugar which is baked to go golden and crunchy.

    Origin story

    Crumbles came about during World War II when food was rationed and the breadcrumb-like topping was a far more economical way to create a dessert over making a pie during a time when ingredients were limited. To further reduce the use of flour, oat and often breadcrumbs could be used to top this dessert.

    The most popular crumble fillings are apple and rhubarb.

    Served with

    Served hot with custard, cream or ice cream.

    Recipe

    Click here for Jamie Oliver’s rhubarb crumble.

    Lorem ipsum dolor sit amet, consectetur adipiscing elit. Ut elit tellus, luctus nec ullamcorper mattis, pulvinar dapibus leo.

    6. Jam Roly-Poly

    What is it?

    A jam roly-poly is not dissimilar to a Swiss roll in that it’s spread with strawberry jam and rolled up before being steamed or baked.

    Origin story

    The jam roly-poly is another Victorian era suet pudding creation, honestly how the women survived in corsets is beyond me. It was originally rolled up and steamed within an old shirt sleeve which got it the appetising nicknames: shirt-sleeve pudding and dead man’s arm… yum!

    It’s a simple delight that’s a popular choice with kids and is a staple dessert on school dinner menus across the nation. 

    Served with

    Serve hot with warm custard.

    Recipe

    Click here for The Hairy Biker’s jam roly-poly pudding recipe.

    7. Trifle

    What is it?

    I’m sure many Brits would agree that Christmas wouldn’t be Christmas without a trifle.

    Trifle is the traditional English dessert that Rachel Green was trying to make for Thanksgiving when she got mixed up with shepherds pie in Friends, “The One Where Ross Got High”.

    It’s made up of layers of sponge soaked in booze, fruit, jam/jelly and English custard that is topped off with whipped cream and sprinkled with either chocolate shavings or almond flakes. 

    Just like a crumble, the fruit can be your own choice. Strawberry is a firm favourite but it’s equally delicious when made with seasonal fruits.

    Origin story

    The trifle is one of the oldest desserts in British history and was first published in 1585 in Thomas Dawson’s cookbook, The Good Huswifes Jewell. It evolved from a fruit foole which is a dessert made from fruit mixed into a sweetened cream.

    The Scottish version is a tipsy laird and in the US there’s a trifle variant called a tipsy cake… yeah, a boozy one for sure, but you can swap out the sherry (etc.) for fruit juice so it’s more appropriate for the kiddies to eat.

    Served with

    As trifle is made with layers of custard and cream, it doesn’t need to be served with anything.

    Recipe

    For a traditional trifle recipe made with jam, click here for Mary Berry’s recipe.

    For Jamie Oliver’s trifle recipe made with jelly, click here. 

    8. Eton Mess

    What is it?

    Eton mess is a delightfully simple dessert made from meringue, cream and summer berries.

    Origin story

    Eton mess is a dessert that originates from Eton College, the poshest all boys school in the United Kingdom; it’s where Princes William and Harry went to school.

    Eton mess is know to have first been made in 1893. Originally Eton mess was made from either strawberries or bananas mixed with either ice cream or cream and was available from their tuck shop in the 1930s. It was years later that the meringue was added. Its name comes from its place of origin and the fact that it wasn’t well presented.

    Legend goes that a dessert of strawberries, cream and meringue was accidentally dropped on the floor during the annual Eton vs Harrow cricket match in the late 19th century, instead of letting it go to waste, they scooped it up and served it anyway. It is now served every year at the cricket match, however you can get it from most pubs in summer or it’s easy peasy to make at home, especially if you use pre-made meringues.

    Served with

    As Eton mess is made with cream, it doesn’t need to be served with anything else.

    Recipe

    Click here for an Eton mess recipe that teaches you how to make meringues from scratch.

    9. Knickerbocker Glory

    What is it?

    A knickerbocker glory is a British ice cream sundae.

    Origin story

    The knickerbocker glory is known to have been around since 1920s but its true origin story seems to be lost in a multitude of claims from being named after the popular Dutch surname to Lyon producing a series of desserts named after outer-garments.

    Served with

    As knickerbocker glories are packed full of cream and ice cream, it doesn’t need to be served with anything else.

    Recipe

    Click here for Mary Berry’s knickerbocker glory recipe.

    10. Banoffee Pie

    What is it?

    Banoffee pie is an incredibly indulgent pie filled with toffee, sliced bananas and cream.

    Origin story

    The banoffee pie is the most recent dessert creation on this list. It was first created in East Sussex by British restaurateur Nigel Mackenzie in 1972 when he and his chef Ian Dowding were making a Blum’s Coffee Toffee Pie but decided to adapt it to include fruit. It instantly took off and became a permanent dessert on the menu at The Hungry Monk. The recipe became accessible to all when Nestlé printed it on the side of their cans of Carnation condensed milk. 

    Served with

    As banoffee pie is topped with lashings of cream, it doesn’t need to be served with anything but it can be served with ice cream.

    Recipe

    Click here for Mary Berry’s classic banoffee pie recipe. 

    11. Treacle Tart

    What is it?

    Treacle tart is a shortcrust pastry base filled with a thick golden syrup mixture and is probably the sweetest one on here.

    Origin story

    The recipe for treacle tart first appeared in one of Mary Jewry’s cookbooks in 1879 but it was made with a much thicker black treacle and isn’t a representation of the treacle tart Brits know and love today. The modern treacle tart came about in the 1880s with the invention of golden syrup.

    It was a popular dessert with less fortunate families as it could simply be made with bread and treacle which were much cheaper ingredients than fresh fruits.

    PFH Fun Fact: “treacle tart” is cockney slang for “sweetheart”.

    Served with

    Served hot or cold with whipped or clotted cream or ice cream.

    Recipe

    Click here for James Martin’s treacle tart recipe. 

    .

    I hope you have sweet tooth!

    Gabriella

    Pin this post


  • Top 6 classic English cocktail recipes

    Top 6 classic English cocktail recipes

    England, as it turns out, has created some of the world’s most famous and favourite cocktails. Hands up if you’ve ordered an espresso martini in the hopes that you’ll be able to suppress your yawns with the caffeine kick and hide the fact that you would rather be in bed binging Netflix – you’re not alone. It’s also not far off how the famous British cocktail, the espresso martini, was created one night in London – or so rumour has it!

    One of my favourite things to do on my travels is to try a local tipple that has a historical or cultural connection to where I’m visiting. I find you can learn a lot about the history of a place from its cocktail creations. From the sweet, fruity sip of a Singapore Sling created to disguise alcohol for female socialites so they could “acceptably” drink in public settings, to the warming sip of a New Orleans’ Sazerac, known to be the world’s first cocktail that is famously served in a bar – The Sazerac Bar – that up until 1949, only served men.

    With the help of The Ivy Brasserie Norwich I was able to put together this cocktail list of six classic English cocktails. Here you’ll learn a bit about their creation, what’s in them and how to make them. I can guarantee you that just as long as alcoholic beverages are your thing, then there is something here for you whether you prefer sweet, sour or straight up boozy, one of these is sure to delight. When ordering these cocktails, go to a bar, like The Ivy, where you can guarantee you’ll not only be served by experienced bartenders but at a well-stocked bar so that they are able to create cocktails that aren’t on their menu. For this reason, your average pub shouldn’t be your go-to when ordering these cocktails.

    So let’s find out the origin story of the following 6 classic English cocktails and the recipes for how you can make these famous British cocktails at home.

    1. Vesper Martini

    The Vesper Martini cocktail was created by British writer, Ian Fleming in his very first James Bond novel, “Casino Royale”, published in 1953. It’s named after the double agent, Vesper Lynd, one of Bond’s many, many, lovers but arguably his first and only love.

    As in true Bond style, his martini preference is, altogether now, “shaken, not stirred,” but the golden rule is to always stir a spirit-only drink and not shake it as it dilutes the drink, but as per Mr. Bond’s strict instructions to “shake it very well until it’s ice-cold,” the Vesper Martini must also be shaken, not stirred.

    Be warned the Vesper martini is the strongest drink on this list of English cocktail drinks, so take it easy with this one.

    Ingredients to make a Vesper martini cocktail

    60ml Gordon’s gin

    20ml Vodka

    10ml Kina Lillet (White vermouth)

    Ice

    Strip of lemon zest

    How to make a Vesper Martini cocktail


    • Pour the gin, vodka and white vermouth into a shaker with ice.


    • Shake until the shaker is ice cold.


    • Double strain into a martini coupe glass.


    • Pinch the zest to spray over the glass then place the zest into the glass.


    2. Espresso Martini

    The world famous espresso martini was created by London bartender, Dick Bradsell, in 1984 upon request by a then up and coming British super model for “something that will wake me up and then f**k me up?”.

    The queryable thing here is that the model is rumoured to be Naomi Campbell but with a simple Google, it’s a struggle to believe, even with my background in working with models, that a 14 year old Naomi was storming bars and demanding drinks when she wasn’t even “discovered” until she was 15!

    Anyway, in 1984 upon this request Dick Bradsell came up with what is now one of the most classic cocktails in the world: the espresso martini. Bradsell’s espresso martini creation combined coffee to wake her up and vodka to do the rest. He says that the coffee machine was right next to the station where he served drinks and so it was on his mind when he was putting together this classic cocktail recipe.

    Ingredients to make an espresso martini cocktail

    40ml Vodka

    20ml Coffee liqueur (recommended: Kahlua)

    20ml Espresso

    Ice

    3 coffee beans

    How to make an espresso martini cocktail


    • Make a shot of espresso and leave it to chill.


    • Pour the vodka, coffee liqueur and espresso into a shaker with ice.


    • Shake vigorously in order to create a froth and until the shaker feels ice cold.


    • Strain into a chilled martini coupe glass.


    • Garnish by placing three coffee beans onto the top of the foam.


    Bars across the UK have began created all sorts of magical variants of the traditional English espresso martini cocktails including The Ivy who does a Salted Caramel Espresso Martini.

    3. Gimlet

    The Gimlet became popular in England after its mention in the 1953 novel by Raymond Chandler, The Long Goodbye. Before then, it is said to have been created in the late 19th century with the purpose of preventing sailors from getting scurvy. Its name is credit to two sources so without really knowing which one is right I’m letting you know both: one is after a hand-held tool for boring holes, which was used on the ships and the other is after Rear-Admiral Sir Thomas Desmond Gimlette who is sometimes credited as the original creator of the Gimlet after he mixed his daily ration of lime cordial (to prevent scurvy) with gin.

    When the Gimlet was first created it was 50% gin and 50% lime cordial, since then the Gimlet’s proportions have changed and are now served more to a 1 part lime and 2 parts gin standard, I’m including the original volume below as it’s the traditional recipe.

    Ingredients to make a gimlet cocktail

    50ml Rose’s Lime Juice Cordial

    50ml Gin

    Ice

    Strip of lime zest

    How to make a gimlet cocktail


    • Pour the gin and lime syrup into a shaker with ice.


    • Shake until the shaker feels cold.


    • Strain into a chilled martini glass.


    • Pinch the zest to spray over the glass then place the zest on the rim of the glass.


    In term of taste, it’s really not dissimilar to a Brazilian Caipirinha.

    4. Bramble

    The Espresso Martini wasn’t British bartender. Dick Bradsell’s only cocktail creation, he also came up with another classic English cocktail: the bramble. Bradsell invented the bramble in the 80s at Fred’s Club in Soho, London and says it was inspired by the blackberries he used to pick on the Isle of Wight as a child. When looking to create this simple cocktail he adapted a Singapore Sling. He dropped a few ingredients and served it in a short glass and called it a Bramble after the bush in which Blackberries (the dominant flavour of this cocktail) grow on.

    Ingredients to make a bramble cocktail

    50ml Gin

    25ml Lemon juice

    2 bar spoons simple sugar syrup

    2 bar spoons crème de mûre (blackberry liqueur)

    Ice

    Crushed ice

    Blackberries

    Strip of lemon zest

    How to make a bramble cocktail


    • Pour the gin, lemon juice and syrup into a shaker with ice.


    • Fill an Old Fashioned glass with crushed ice.


    • Drizzle the crème de mure over the ice.


    • Strain the cocktail into the glass and garnish with blackberries and lemon zest.


    5. Tom/John Collins

    John Collins created the classic English cocktail John Collins in a restaurant in London around 1860. In 1874 a popular joke was being told in New York whereby people would start a conversation asking if someone had seen Tom Collins, they would then proceed to say that this Tom Collins has been talking smack about them and that they should go find them. Tom Collins was a fictional person. Rumour has it that one day a witty barman made a John Collins and served it to a man asking for a Tom Collins and from that moment on, the name of the cocktail changed to Tom Collins and was so cemented that in 1876 Jerry Thomas, known as “the father of American mixology” published the recipe to a John Collins as a Tom Collins is his book, The Bartenders’ Guide. Poor John, right?

    John hasn’t been completely left behind though, as now a John Collins is known as the rum based version of his original cocktail.

    The classic Tom Collins cocktail is a long drink, perfect for sipping out on the grass on a summer’s afternoon or accompanying a weekend brunch.

    Ingredients to make a Tom Collins cocktail

    50ml Gin (Tom) or rum (John)

    25ml Lemon juice

    25ml Simple sugar syrup

    125ml chilled soda water

    Strip of lemon zest

    How to make a Tom Collins cocktail


    • Fill a Collins glass with cubes of ice.


    • Pour in the gin, lemon juice and syrup.


    • Stir to combine and then top off with the soda water.


    • Garnish with lemon zest.


    6. Pimm’s No1. Cup

    To find out how to make one of the most famous British cocktails, a Pimm’s fruit cup, head to my previous blog post: How to make the perfect pitcher of Pimm’s No1. Cup You’ll also get to learn more about the history of this classic English cocktail and its important and beloved place in British culture.

    .

    So there you have it, 6 English cocktails, which one are you eager to try? Let me know in the comments below if you make one of the drinks from this classic cocktail recipe list and what you thought of it!

    Do more on & for the planet, Gabriella

    Please drink responsibly.

    Pin this post


    .

    The Ivy uses biodegradable straws, should you wish to use your own, just request that no straw is served in your drink.

  • Mauritian achard légumes (vegetable pickle) recipe

    Mauritian achard légumes (vegetable pickle) recipe

    Achard légumes is a Mauritian mixed vegetable pickle that originates from the Indian dish, achaar.

    Though it took me a long time to acquire an appreciation for the taste of achard légumes, its place on the table in my family is a nostalgic one. This bright yellow, orange and green dish has been present at almost every large family gathering and for me, conjures the same comforting summer feels as strawberries and cream. 
    Achard légumes is one of the best side dishes you can make because it compliments such a wide variety of meals. It can be eaten with a curry or rougaille along with many other side dishes, or it can be eaten with a roti (Mauritian flat bread) or fresh bread, it can go into a sandwich or on a salad and it goes great with a BBQ or a cheese board. It’s a really flavoursome way to bring a variety of vegetables to whatever you’re eating.
    Just like the rougaille recipe I shared last month, this achard légumes recipe is my Mum’s, so there are variations.  Her adaptation is that she doesn’t use vinegar or cauliflower because my Papa, her Dad, didn’t like it so he didn’t use it. Many of the tweaks to our Mauritian recipes come from my Papa not having liked something!

    This achard légumes can last up to two weeks if refrigerated if you do the following:


    • Fry all of the onion as this recipe tells you to. Some recipes will tell you to only fry half and add the rest in raw but this makes the achard watery and it won’t preserve for as long.


    • Add salt just before eating. Salt will also make the achard watery and again, it won’t last as long.


    • Prep your vegetables the day before you are planning to cook it. By allowing the vegetables to dry out overnight, the achard will last longer.


    I almost forgot to point out, though you will be able to work it out from the ingredients list below, it’s vegan and vegetarian!

    This recipe will serve 4-6 people.

    Ingredients 

    3 carrots

    3 stringless flat beans

    1/4 small white cabbage

    2 shallots

    2-3 cloves of garlic

    1 fresh or dry chilli (add more if you want the achard to have more of a kick)

    1/2 tsp mustard seeds

    2 tsp fresh turmeric (can be dry if you can’t get hold of fresh)

    2 tsp fresh ginger

    4 tbsp oil

    Salt and pepper

    You may also be interested in my Mauritian rougaille recipe to serve as your entrée/main dish.

    Equipment 

    Chopping board

    Sharp knife

    Measuring spoons

    A wok or a large saucepan

    Large cooking spoon (black or metal, keep in mind that the turmeric will stain it)

    When it comes to washing these up, use an old tea towel as the turmeric will stain it.

    Method

    1. Prepare your vegetables a day before and allow them to dry out.


    • Julienne the carrots and beans.


    • Shred the cabbage.


    • Cut the chilli(es) in half, lengthways. If you don’t like too much spice then remove the seeds, if you don’t mind then keep them in.


    2. When you are ready to cook, peel and finely slice the shallots, mince the garlic and ginger and grate the turmeric.

    3. Heat 2 tbsp of oil in the wok/frying pan on a medium heat and fry the shallots.

    4. Add the garlic, turmeric, mustard seeds, chilli, pepper and ginger and stir through. Let them heat through for a few minutes to release their flavour.

    5. Add the carrots and beans. Stir frequently so they get covered with the spices.

    6. Add the remaining 2 tbsp of oil along with the cabbage and cook it until it wilts. The length of time you cook your achard really depends on whether you want the vegetables to be crunchy or soft. The longer you cook it, the softer it gets, so stop cooking it when you are happy. We cook ours for about 10mins so there’s still a little crunch.

    You may also be interested in my family’s rougaille/rougail recipe.

    7. Serve with your food of choice! Add salt just before eating.

    8. Pop the rest into a container (be mindful that this pickle will stain plastic) and store in the fridge for up to 2 weeks.

    .

    Bon appétit, Gabriella

    Pin this post